Concepts → Log-Based Incremental Load
Overview
For releases before 2024.1, Incorta supports only a query-based approach to load data incrementally. This approach relies on either a LAST_UPDATED_TIMESTAMP column or a column with a monotonically increasing maximum value to track changes (MAX_VALUE). If the source table does not include columns that identify the last updated time or newly inserted records, query-based incremental load cannot be used.
To address these challenges, Incorta introduced log-based incremental load starting with release 2024.1, enabling reliable incremental loading for inserts and updates without requiring specific columns, while also eliminating performance impact on source systems.
Support for delete operations
Starting with release 2025.7, the log-based incremental load mechanism was enhanced to support delete operations in the source system through a soft delete approach in Incorta.
After upgrading from a previous release to 2025.7 or later releases:
- When creating a new table using log-based incremental load, a special column is added to indicate delete operations. You can use this column:
- In queries to filter out soft-deleted rows.
- In a purge job to physically remove these rows from Incorta.
- This column is added to existing tables with log-based-incremental loads when you validate the tables.
Optimized performance using schema registry
Connector version 2.2.5.0 introduces schema registry integration with Apicurio, fundamentally improving incremental data ingestion performance by externalizing schema definitions from individual Kafka messages to a schema registry service, eliminating redundant schema metadata embedded in each message. This enhancement dramatically reduced message payload sizes, significantly accelerating log-based incremental loads while reducing network bandwidth and storage requirements.
Additionally, schema registry supports AVRO message format processing, delivering superior binary compression and serialization efficiency compared to verbose JSON formats, further accelerating data transfer speeds and optimizing infrastructure costs for high-volume streaming workloads.
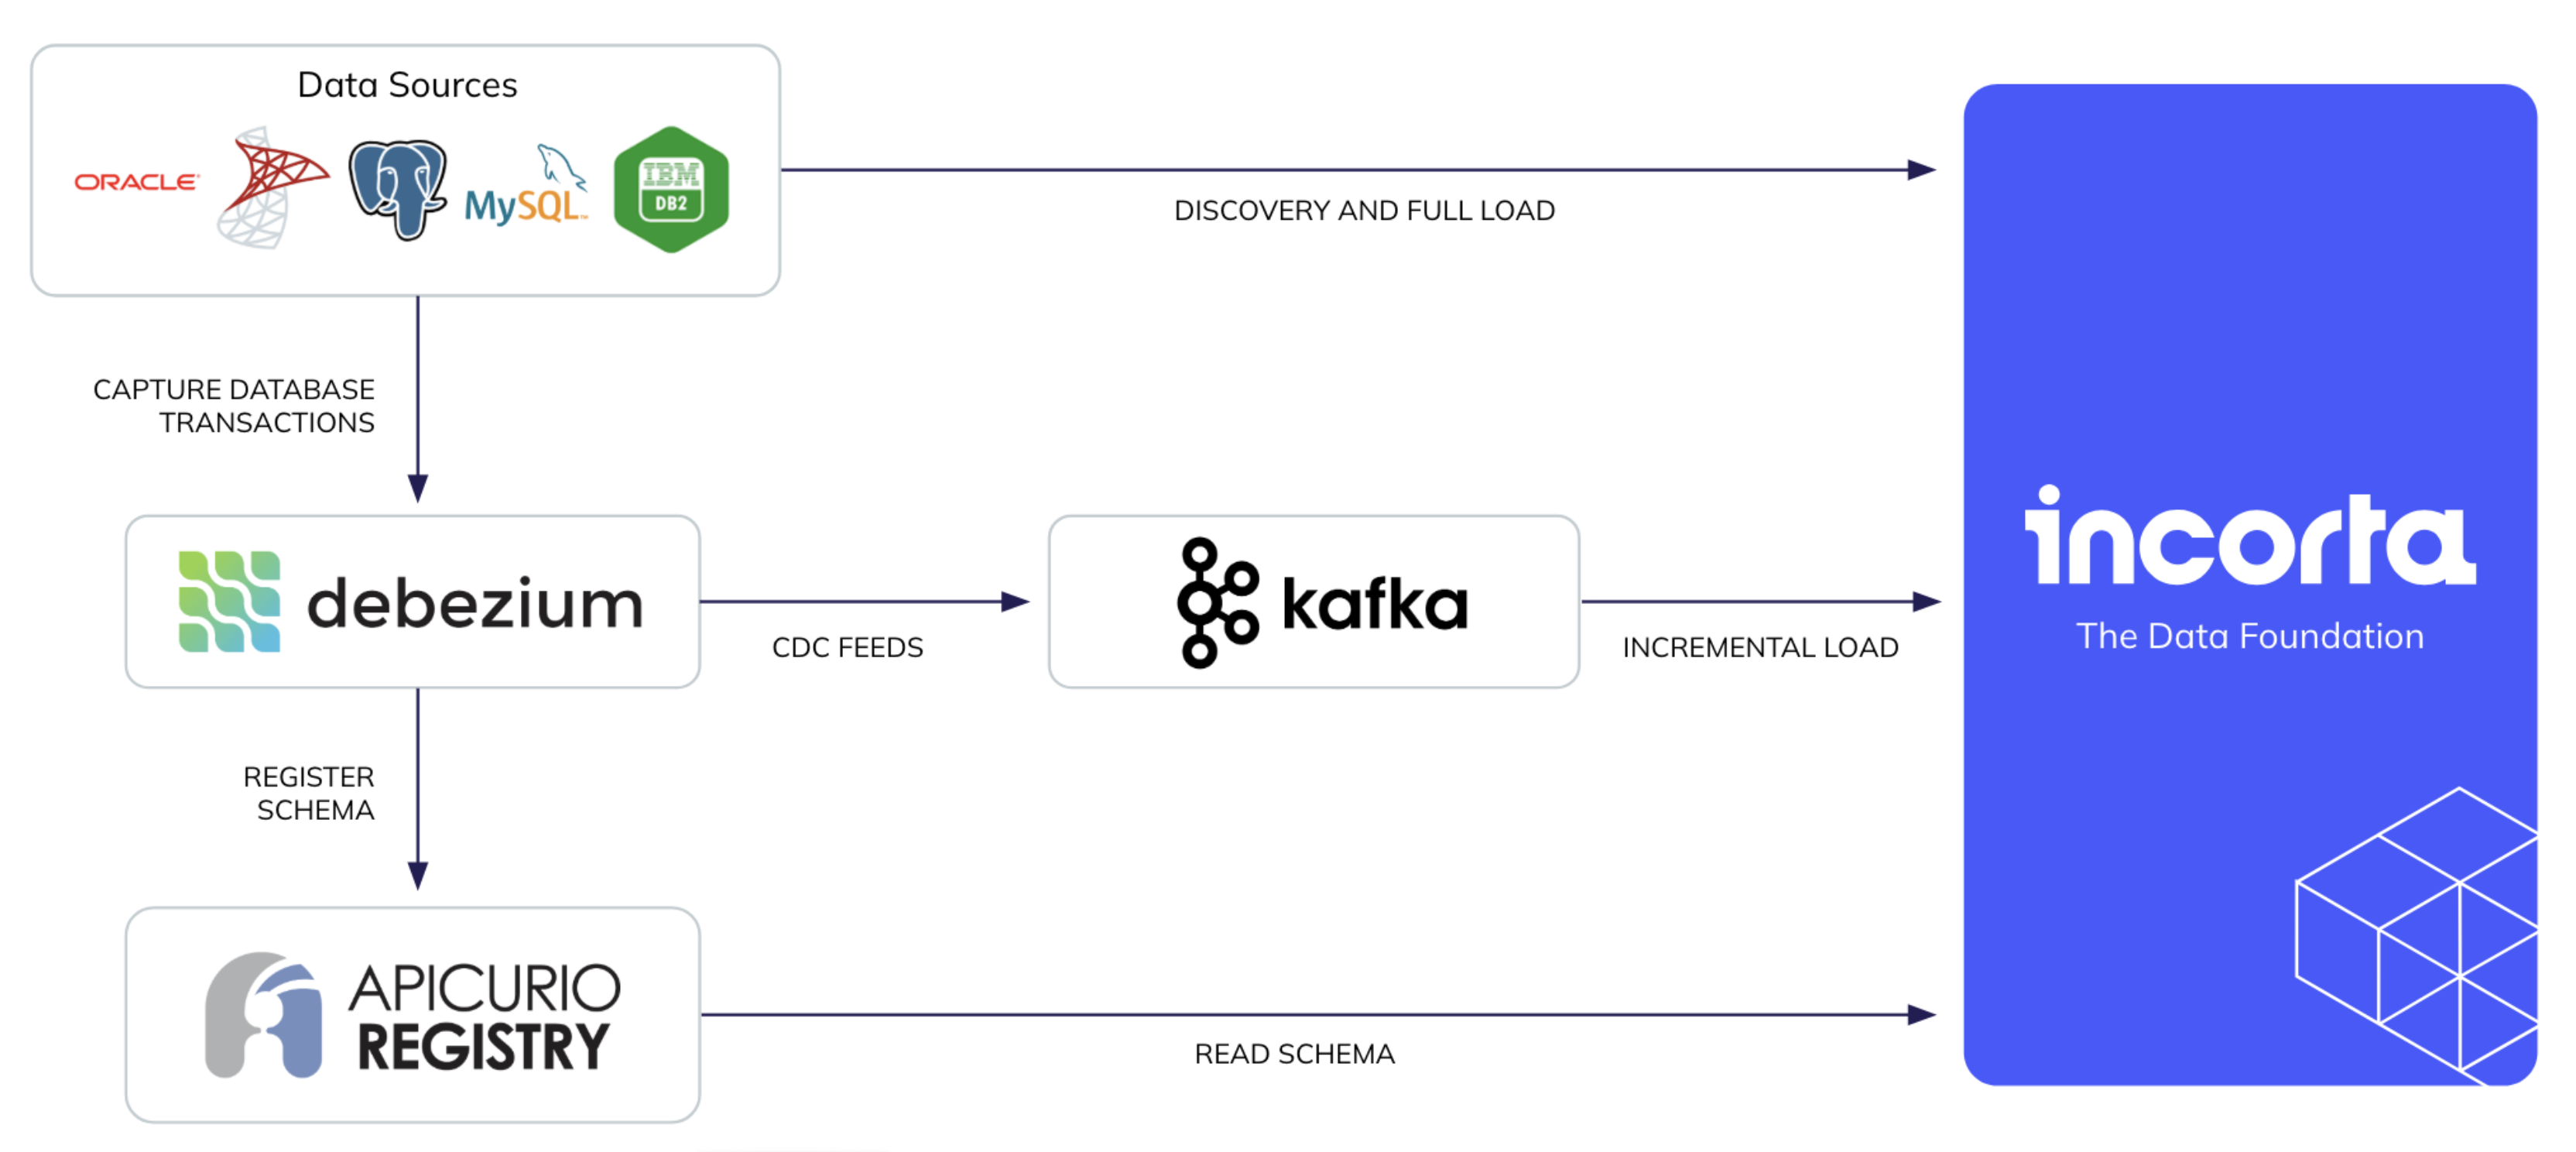
Architecture
The following diagram shows the architecture of the log-based incremental load implementation as of 2026.5.0.
Prerequisites
To use the log-based incremental load, do the following:
- Install and configure Apache Kafka and Kafka Connect.
- Set up the source database so that Debezium connector can capture the transaction change.
- Configure the Debezium connector. Debezium is an open-source distributed platform for Change Data Capture (CDC).
- Disable snapshot while configuring Debezium.
- Ensure that the Debezium connector is configured to send data types to Incorta by adding the propagate property.
- Log-based incremental load supports only database physical tables with primary keys.
- In the case of using the Apicurio schema registry (available starting with connector version 2.2.5.0, configure it before enabling the feature.
- If the message format is Avro, configure the Debezium connector.
Supported connectors
The log-based incremental load is currently supported for the following SQL-based connectors:
- IBM DB2 (supported starting connector version 2.2.5.0)
- Microsoft SQL Server
- MySQL
- Oracle
- PostgreSQL
- You might face issues with the
INTERVALdata types in Oracle and PostgreSQL. - In connector versions before 2.2.3.0, log-based incremental load supports only Kafka topics with a single partition.
How it works
After completing the prerequisites, do the following:
Step 1: Create a data source with log-based incremental load enabled
- In the Data Manager, create or update a data source using a supported connector.
- Turn on the Enable the Log-Based Incremental Load toggle.
- Set the related configurations. For details, see Log-based incremental load configurations.
- Save the changes.
Detailed configurations:
Log-based incremental load configurations
The following table describes the available properties when you enable log-based incremental load for a data source using a supported connector.
| Property | Control | Description |
|---|---|---|
| Kafka Topic Prefix | text box | Enter the prefix part in your Kafka topic names that the CDC tool, Debezium, for example, uses to route all schema changes to. |
| Kafka Cluster URl(s) | text box | Enter a comma-separated list for your Kafka cluster URLs in the following format: listener.security.protocol://your.host.name:port For example: PLAINTEXT://localhost:9092, SSL://myKafkaServer:9093 |
| Consumer Configurations | text box | A line-separated list of connection properties in the format: propertyName=propertyValue. For a complete list of properties, refer to the Kafka online documentation > Configuration > Consumer Configs. |
| Security Protocol | dropdown list | Select the security protocol your Kafka server uses. Available options are: ● Use Consumer Properties (if you have provided the required configurations in the consumer properties) ● None ● SASL PLAINTEXT ● SSL |
| SASL PLAINTEXT > SASL Mechanism for Client Connection | dropdown list | Specify the authentication method used within the Simple Authentication and Security Layer (SASL) framework to verify identities. Available opinions are: PLAIN (simple username/password) GSSAPI (Kerberos) |
| SASL PLAINTEXT > JAAS Config | text box | Enter the Java Authentication and Authorization Service configurations |
| SASL PLAINTEXT > JAAS Username | text box | Enter the JAAS username |
| SASL PLAINTEXT > JAAS Password | text box | Enter the JAAS password |
| SASL PLAINTEXT > Use Secret Manager | checkbox | Available only when you configure a secret manager in the CMC. Select the checkbox to enter the password identifier in the integrated secret manager instead of its value. |
| SASL PLAINTEXT > JAAS Password Identifier | text box | Available when you select the Use Secret Manager checkbox. Enter the identifier of the JAAS password. |
| SSL > Protocol | dropdown list | The protocol to be used for the TLS communication. Available options are: ● TLS v1 ● TLS v1.1 ● TLS v1.2 |
| SSL > Endpoint Identification Algorithm | text box | Specify the algorithm for the hostname validation. An empty string disables hostname verification, which is the default. Enter https to enable hostname verification. |
| SSL > Trust Store File | button | To upload a trust store file, select Choose File. In the Finder or File Explorer, select your trust store file, such as kafka.client.truststore.jks |
| SSL > Use Secret Manager | checkbox | Available only when you configure a secret manager in the CMC. Select the checkbox to enter the trust store file identifier in the integrated secret manager instead of uploading the file itself. |
| SSL > Trust Store File Identifier | text box | Available when you select the Use Secret Manager checkbox. Enter the identifier of the trust store file. |
| SSL > Trust Store Password | text box | Specify the password of the trust store file. Without a password, the trust store file remains available, but without integrity checks. |
| SSL > Use Secret Manager | checkbox | Available only when you configure a secret manager in the CMC. Select the checkbox to enter the trust store password identifier in the integrated secret manager instead of its value. |
| SSL > Trust Store Password Identifier | text box | Available when you select the Use Secret Manager checkbox. Enter the identifier of the trust store password. |
| SSL > Key Store File | button | To upload a key store file, select Choose File. In the Finder or File Explorer, select your key store file, such as Kafka.client.keystore.jks. |
| SSL > Use Secret Manager | checkbox | Available only when you configure a secret manager in the CMC. Select the checkbox to enter the key store file identifier in the integrated secret manager instead of uploading the file itself. |
| SSL > Key Store File Identifier | text box | Available when you select the Use Secret Manager checkbox. Enter the identifier of the key store file. |
| SSL > Key Store Password | text box | Specify the password key store file |
| SSL > Use Secret Manager | checkbox | Available only when you configure a secret manager in the CMC. Select the checkbox to enter the key store password identifier in the integrated secret manager instead of its value. |
| SSL > Key Store Password Identifier | text box | Available when you select the Use Secret Manager checkbox. Enter the identifier of the key store password. |
| SSL > Key Password | text box | Specify the password of the private key in the key store file |
| SSL > Use Secret Manager | checkbox | Available only when you configure a secret manager in the CMC. Select the checkbox to enter the key password identifier in the integrated secret manager instead of its value. |
| SSL > Key Password Identifier | text box | Available when you select the Use Secret Manager checkbox. Enter the identifier of the key password. |
| Use Schema Registry | dropdown list | This option is available starting with connector version 2.2.5.0. Specify if you use a schema registry to save the Kafka schema definition instead of including it in the messages. The available option for now is Apicurio. |
| Apicurio > Schema Registry URL | text box | Enter the Apicurio host in this format: http://HOST:PORT. |
| Apicurio > Apicurio Schema Registry Cache Expiry (Hours) | spin box | Specify the number of hours for which Incorta caches the schema entries. |
| Apicurio > Schema Registry Cache Size (Entries) | spin box | Specify the maximum number of schema entries that Incorta can cache. |
| Apicurio > Message Format | dropdown list | Select the message format. Available options are: ● AVRO (Optimizes the message size) ● JSON |
| Apicurio > AVRO > Enable Apicurio Confluent Compatible Mode | toggle | Enable this option so that the connector supports Confluent serializers for interoperability with Confluent clients and tools. |
Step 2: Create a dataset based on the data source
- In the Table Editor, create or update a dataset based on the data source you have created in the previous step.
- Turn on the Incremental toggle.
- For the Incremental Type option, select Log-based (CDC).
- Save the changes.
Step 3: Load data incrementally
You can run a manual or scheduled incremental load job to update Incorta physical tables with the changes in the data source.
In general, new tables require an initial full load first before running an incremental load job, whether query-based or log-based. Skipping this step will cause the first incremental load job to perform a full load instead.