What's New in Incorta Cloud 2022.10.0
Release Highlights
In this 2022.10.0 cloud release, Incorta is introducing multiple new features and enhancements that aim to have a great impact on your business and improve your user experience.
Incorta is introducing BlackLine as a new data destination along with a new data application "BlackLine Reconciliation for Oracle E-Business Suite (EBS)". The new BlackLine data application enables business users to quickly resolve reconciliation issues.
In addition, this release has a new password reset policy for Incorta authenticated users, which enables you to manage password resets for one or all users in your Incorta cluster.
This release also enhances the user experience in different areas, such as uploading data files while adding a new data source and the usage of the between filter for dates in dashboards.
The 2022.10.0 release is available for newly created clusters and new trial users. For already existing customers upgrading from a prior release, please contact Incorta Support to schedule the upgrade.
This release uses the Data Agent version 5.1.0. If you have not already, make sure to upgrade to the data agent version available on the Cloud Admin Portal.
The default password policy has changed starting 2022.10.0. The default policy will be applied only to newly created passwords, whether for new users creating their first password or existing users changing their passwords. However, this will not require that existing users should change their passwords. The new password policy mandates the following:
- The password length must be between 12 and 32 alphanumeric characters.
- A password must contain at least one uppercase letter, one lowercase letter, one special character, and one digit.
- A password cannot include the user login name or email address.
New Features
- BlackLine data destination and data application
- Enhanced file upload experience
- Dashboard delivery support for bookmarks
- Enhanced Between filter for dates
- Tooltip tray for bubble visualization
- Query methods added to Notebook
- Password reset policy for Incorta authenticated users
- Advanced session cookies security options
BlackLine data destination and data application
You can now configure BlackLine as a data destination in Incorta. You can easily share all your financial data from Oracle E-Business Suite (EBS) and other ERP data sources with BlackLine in three simple steps.
1. Configure BlackLine as a data destination:
You need to obtain the hostname, username, and password from your BlackLine server administrator. In Incorta, perform the following steps to create your data destination:
- Log in to your Incorta Cluster
- Select the Data tab
- Select + New → Add Data Destination, and select BlackLine
- Enter a name for your data destination
- Enter the credentials you obtained from your administrator
- If needed, test the connection and browse to the required folder
- Select Ok
Refer to Concepts → Data Destination, for instructions on configuring BlackLine as a data destination.
2. Install the BlackLine data application:
You also have the option to build your application or dashboard. To install the BlackLine data application:
- Log in to your Incorta Cluster
- Select the Marketplace tab
- Select the BlackLine Reconciliation for Oracle Oracle E-Business Suite data application card
- Select the Install button
- Load your data, and then Explore it using the wizard
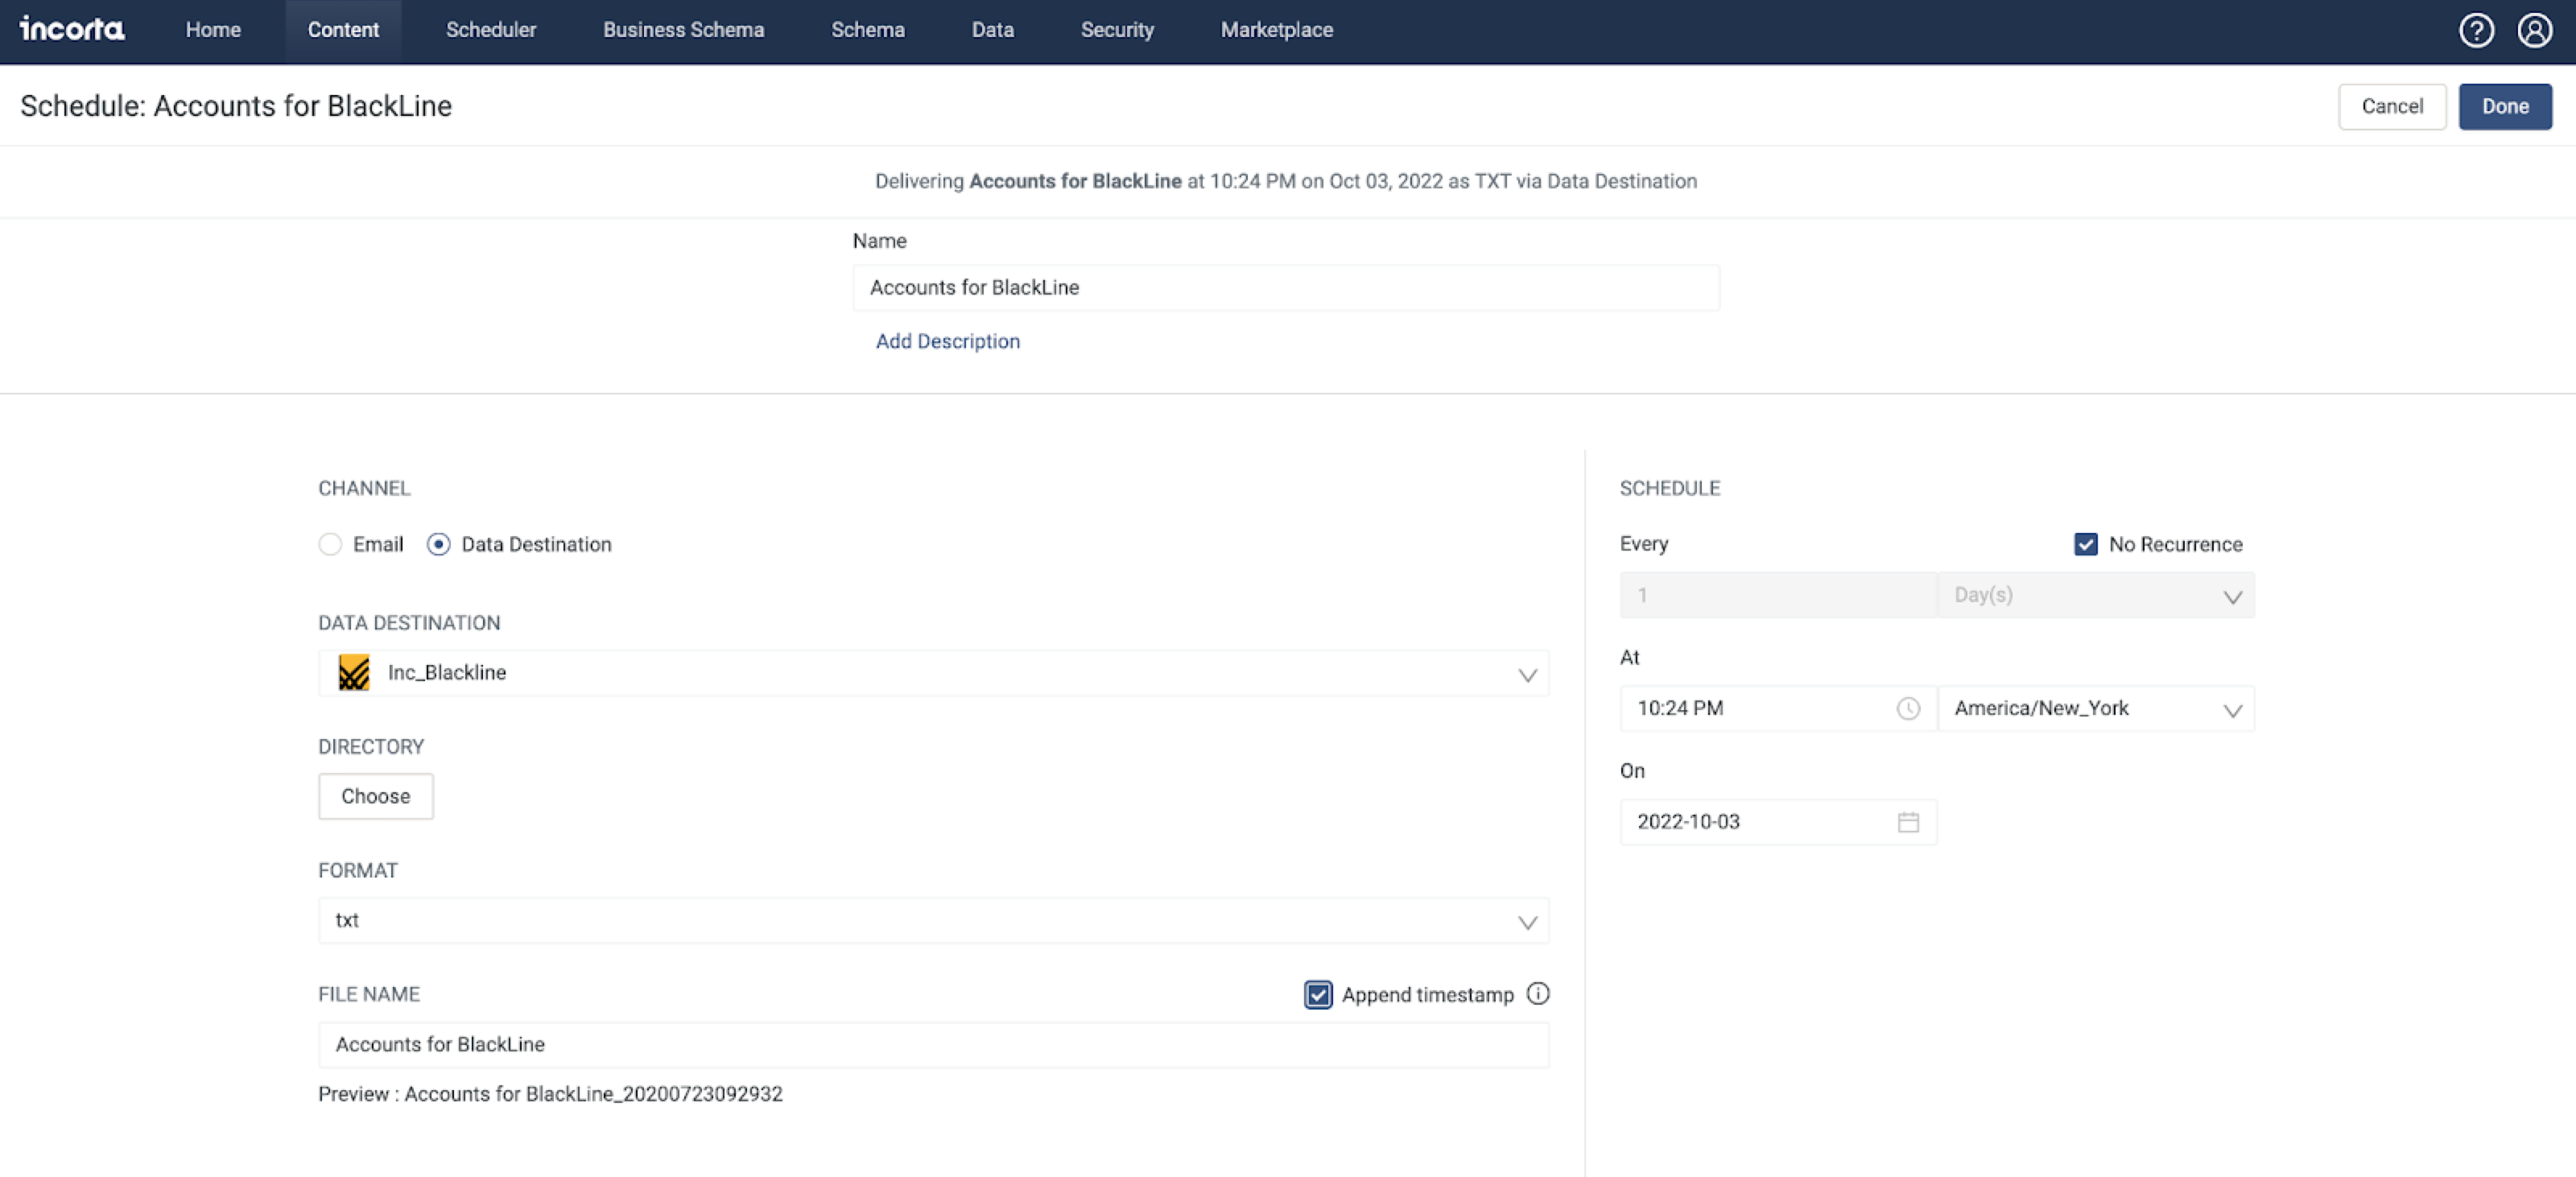
3. Share data with BlackLine:
The data can be shared on adhoc basis or using a predefined schedule based on your requirements:
- Log in to your Incorta Cluster
- In the Content tab, open the Blackline dashboard from step #2
- Select the Share icon
- Select Send/Schedule a Report, and select BlackLine destination that you configured from step #1 as your data destination
- Edit the file name and append a timestap if needed
- Specify the data push schedule on the right
- Select Done
For more information, refer to Data Applications → BlackLine.
Enhanced file upload experience
Incorta has improved the upload file and folder connector. The new enhanced connector is more intuitive and supports:
- Uploading a folder or multiple files seamlessly in one step with a drag and drop operation.
- File size up to 2 GB
- Uploading a
.zipfile - Reviewing the details of each uploaded file: including upload status and exception handling.
In addition, the Local Data Files tab now shows the files/folders uploaded ordered with the last modified files/folders on top.
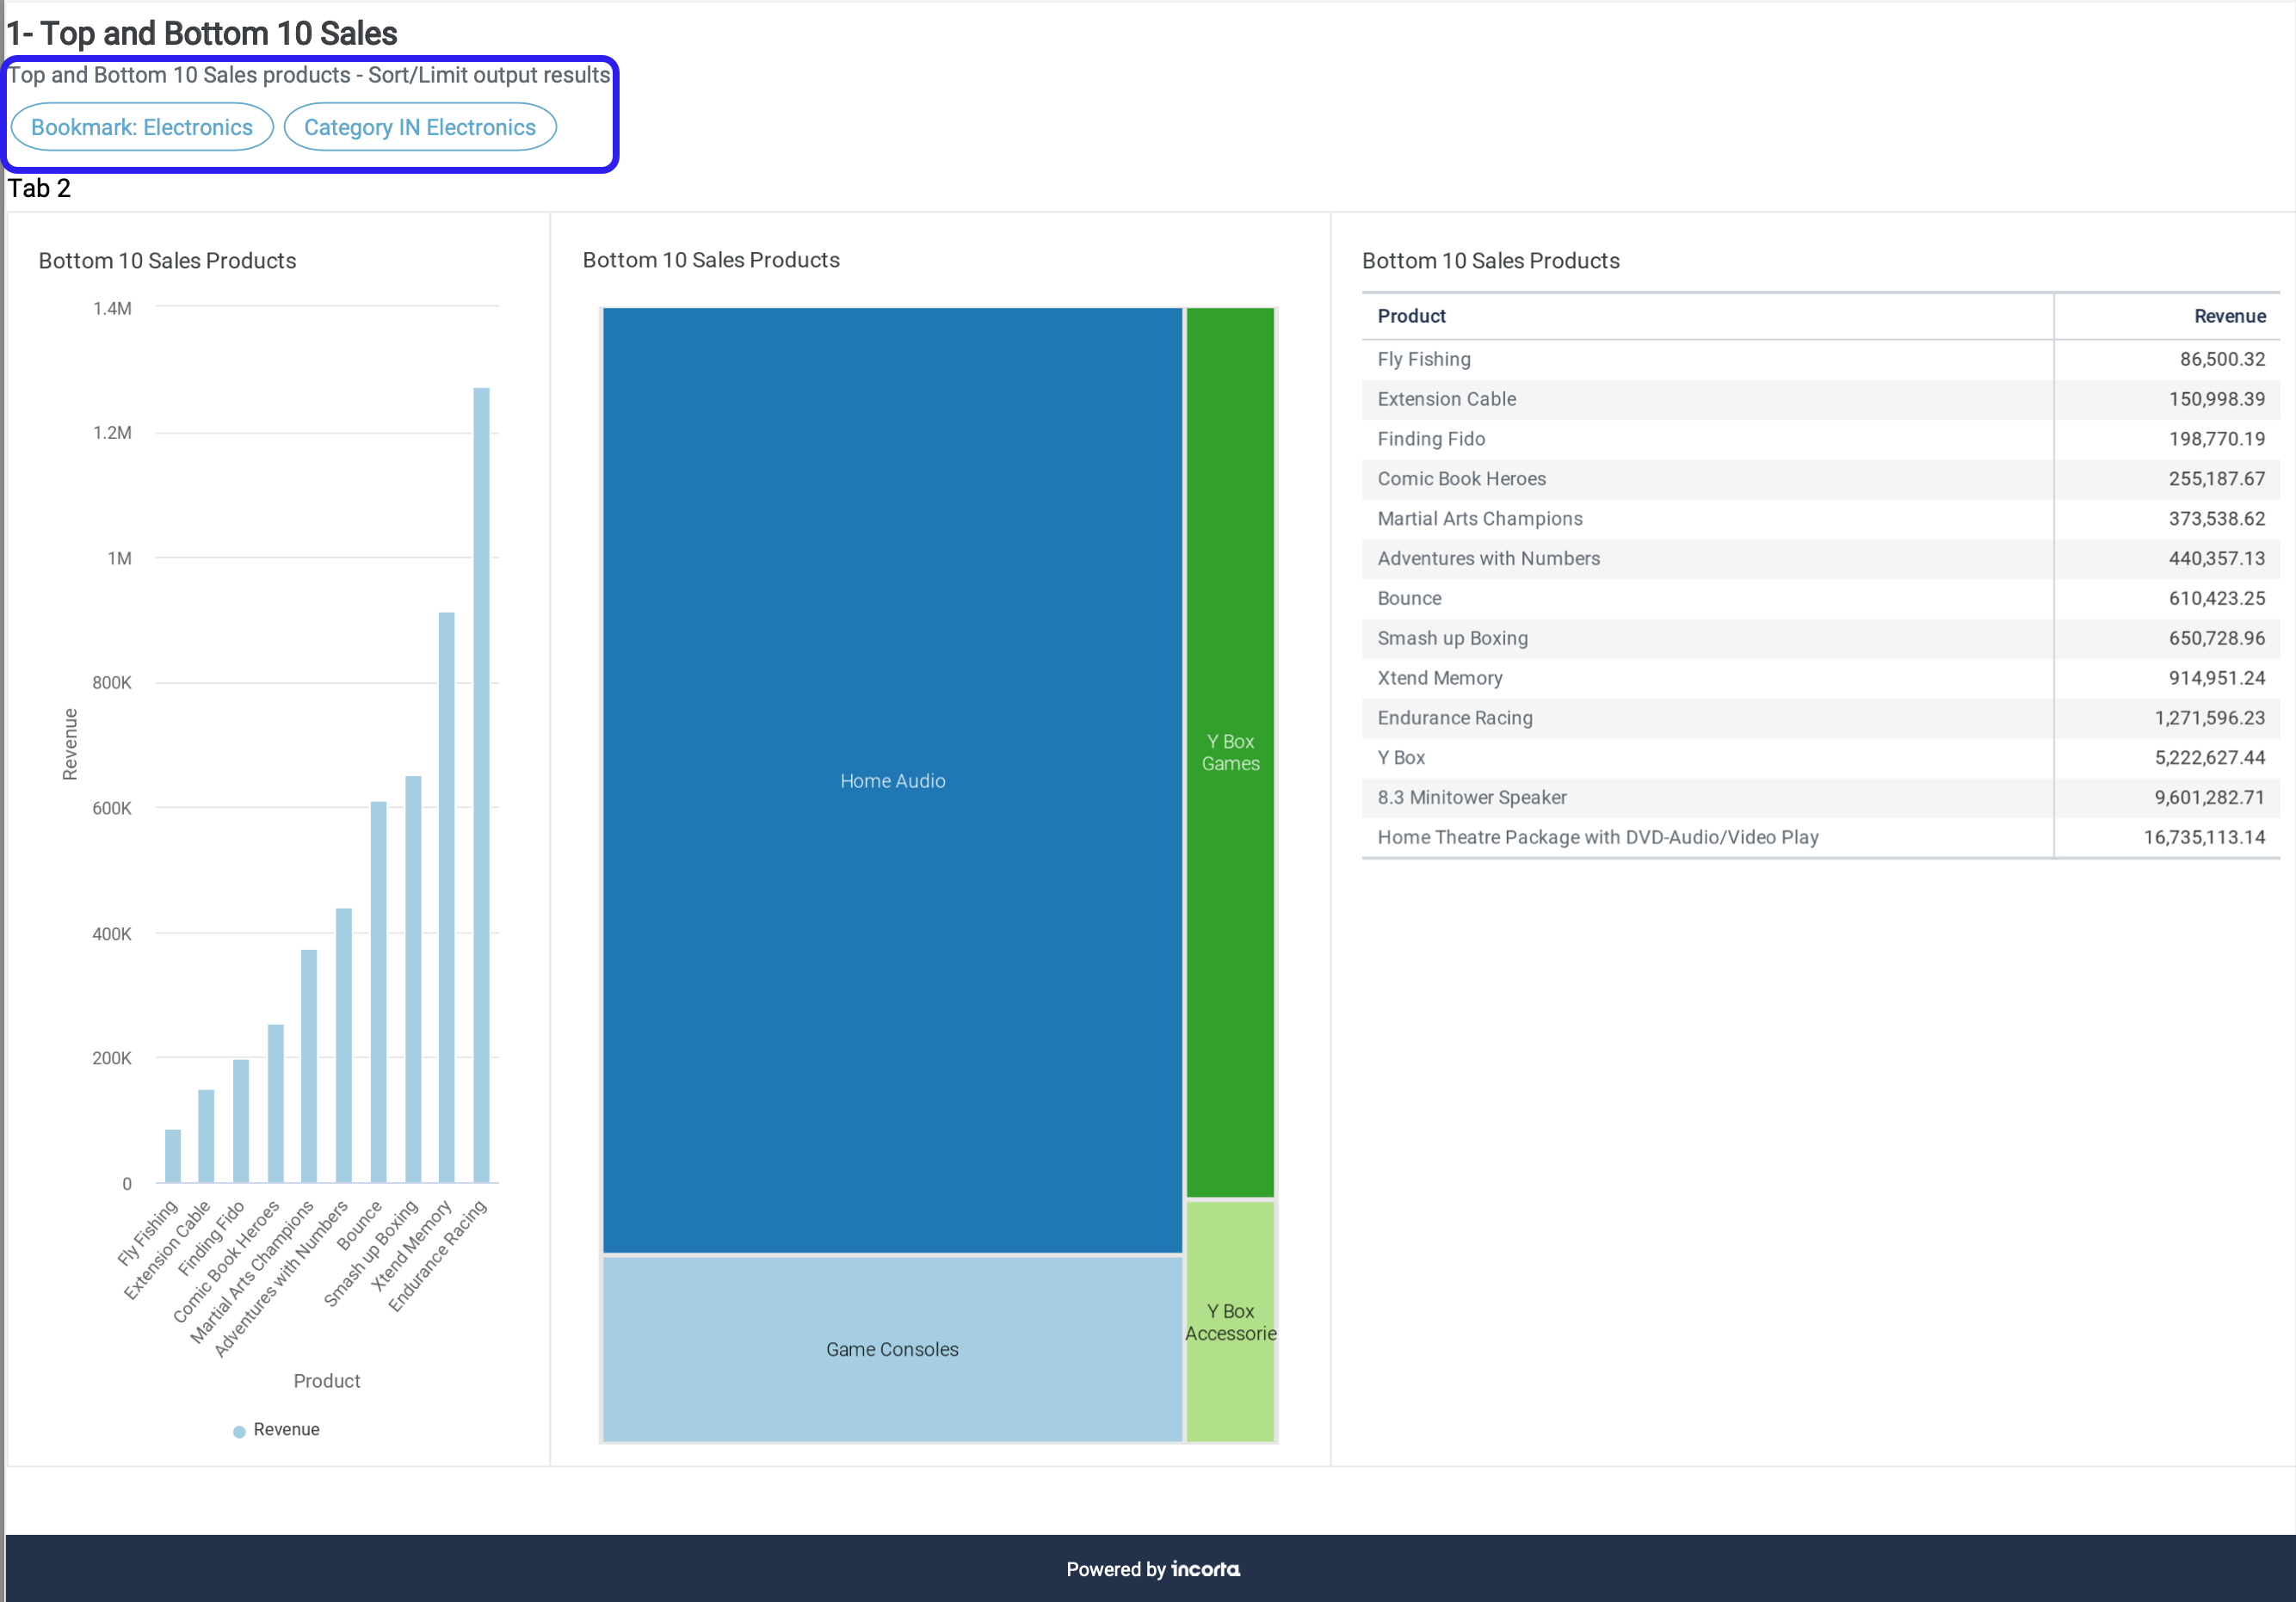
Dashboard delivery support for bookmarks
You can now create scheduled jobs to deliver a dashboard as PDF or HTML to export folders or via email while applying a selected bookmark. You can also select to reveal the bookmark name and the values of the applied filters.
- You can select to apply one of your private bookmarks or a public one.
- Bookmark filters will overwrite any filters or prompts applied to the dashboard when creating the scheduled job.
- You can update bookmarks that you or other users use in dashboard scheduled jobs and have these changes applied in the next job runs.
- You can edit a scheduled job and select a different bookmark.
- Deleting a bookmark suspends the related scheduled jobs. Also, changing a bookmark from public to private suspends all related dashboard scheduled jobs that other users created. However, the scheduled jobs that the bookmark owner created will run as usual.
- You cannot resume a dashboard delivery job that has been suspended due to deleting a bookmark or changing it to private. You have to first update the scheduled job to remove the bookmark or select a valid one.
- You can export and import dashboard jobs with the applied bookmarks. In addition, you can export and import a tenant that has dashboard jobs and bookmarks applied.
- This feature is not available for delivering dashboards as
XLSXorCSV.
For more information, refer to Guides → Analyze → Manage Dashboard Bookmarks.
Enhanced Between filter for dates
Now you can filter your insights in a dashboard using the between operator based on dates. Incorta enables you to select start and end dates. You will also be able to use System Variables to specify a date range.
For example, in a dashboard:
- Select the Filter button
- Choose Order Date as a Category
- Select Start Date
- Enter
$in the End Date field to list available system variables - Select the appropriate system variable
- Select Apply
You must enter the dollar sign $ so you can list the available system variables.
Tooltip tray for bubble visualization
The tooltip tray introduced in the Incorta Cloud 2022.8.0 release is now supported in bubble visualizations. You can drag and drop any column type either measure or dimension to the tooltip tray.
When adding a dimension column to the tooltip tray, Incorta treats it as a measure column. The following aggregations are available:
- Count
- Distinct
- Min
- Max
- None

Query methods added to Notebook
The Incorta Notebook now gives data engineers and data scientists the ability to author SQL and PostgreSQL queries directly inside the Notebook. Previously, users were required to read an entire table into Notebook and write additional code to parse the extracted data.
Using the incorta_sql() method, you can now create an SQL query extracting the specific data you need from a physical schema table.
Using the incorta_sql_pg() method, you can create PostgreSQL queries that query from both the physical schema and the business schema. Leveraging this method will provide a more efficient workflow when creating and working with materialized views. By filtering data on ingest, materialized views will provide better performance.
For more information, refer to Concepts → Materialized view.
Password reset policy for Incorta authenticated users
This release introduces two ways to enforce a password reset policy for Incorta native authenticated users:
- As a User Manager or a Super User, you can use the
resetPasswordspublic API endpoint to instantly reset the password of all Incorta authenticated users. - As the Cloud Admin user, you can enable password expiration so that each Incorta authenticated user will have to change the password at a scheduled cadence.
resetPasswords endpoint
- The
resetPasswordsendpoint requires only the access token of a User Manager or a Super User. - If another user tries to use it, an error message appears.
- After resetting all user passwords, each user will have to define a new password after providing the current one, just as the user has to do when signing in to Incorta for the first time.
For more information, refer to Public API → Reset Passwords Endpoint.
Password expiration
You can enable password expiration per tenant or for the default tenant.
- After signing in to the Cluster Management Console (CMC) as the Cloud Admin user, in the CMC > Default Tenant Configurations/Tenant Configurations > Security, you can do the following:
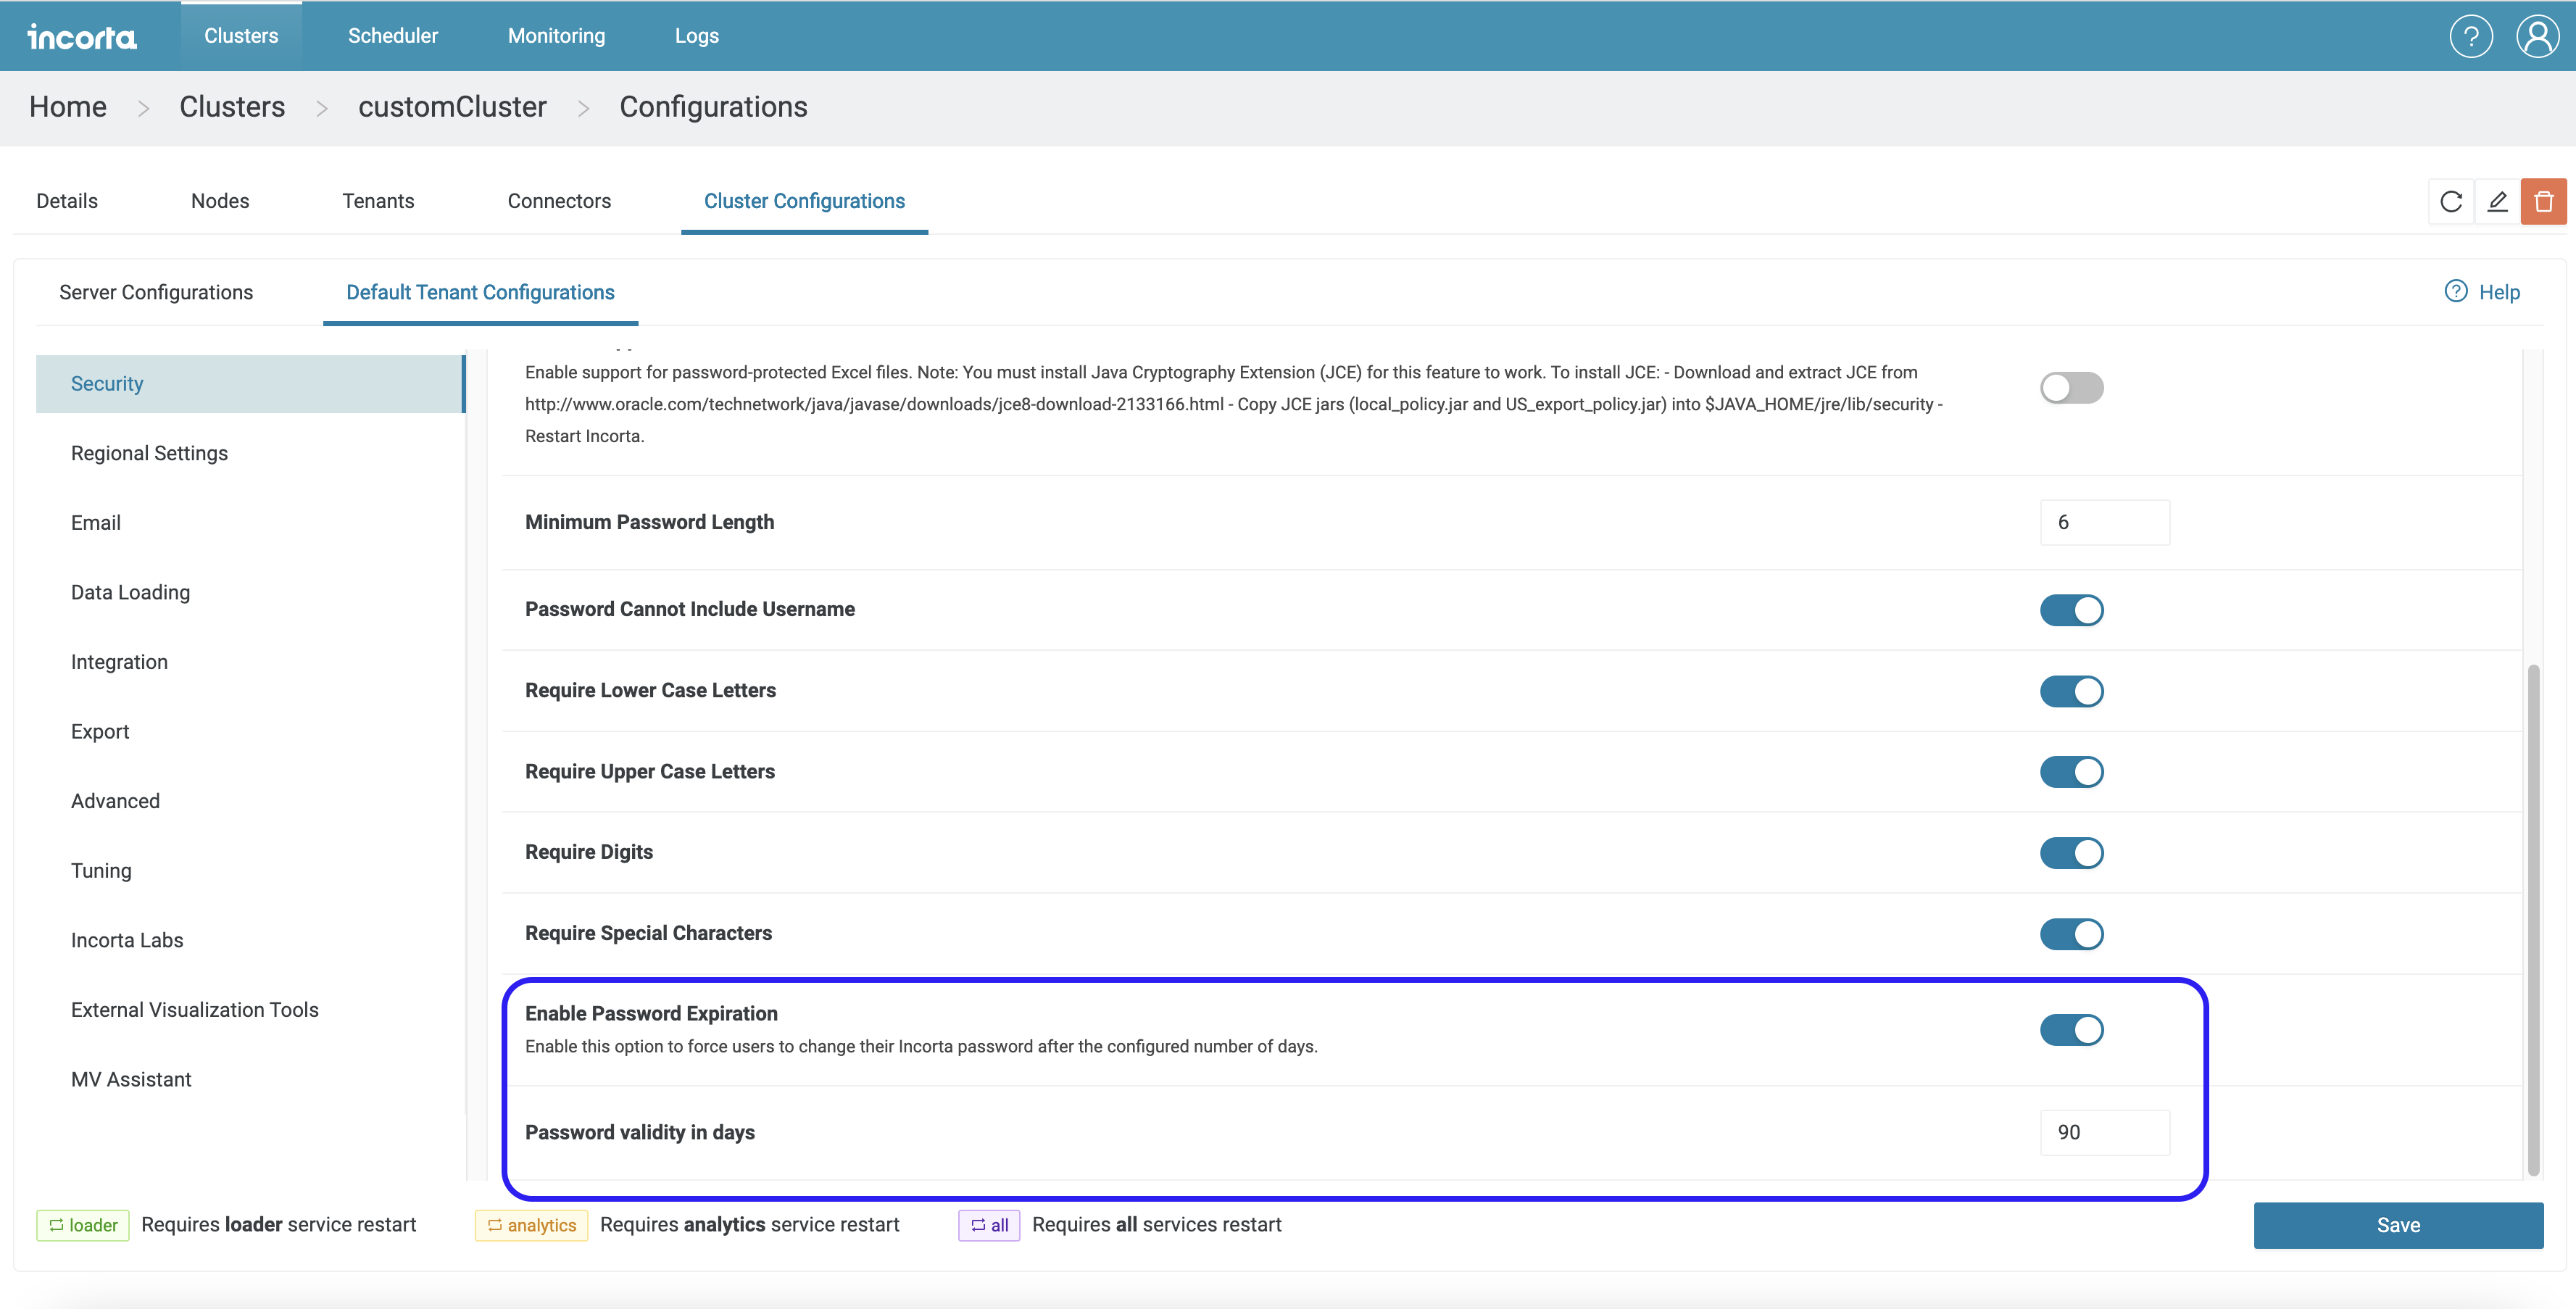
- Turn the Enable Password Expiration toggle on. It is disabled by default.
- In Password validity in days, enter the number of days after which users have to change their password. This number must be between 1 and 365 inclusive. The default value is 90.
- The start of the password validity period is the password modification date.
- After upgrading to 2022.10.0, the password modification date will be the upgrade date.
- For newly created user accounts, the password modification date will be the day when the user creates a new password after successfully signing in to Incorta for the first time.
- When a password expires and the user tries to sign into Incorta, a message appears denoting that the password has expired. The user has to enter the current password and create a new one.
For more information, refer to Guides → Configure Tenants → Incorta Authentication.
The password policy options related to Incorta authentication in the CMC will remain visible even when you select another authentication type. However, they will affect Incorta authenticated users only, such as the Super User and other users you specify Incorta as their authentication method.
Advanced session cookies security options
You can now use the Cluster Management Console (CMC) to secure your session cookies by setting the SameSite attribute to restrict sending cookies to a first-party (same-site) context only and prevent the browser from sending cookies along with cross-site requests. You can also specify the Secure attribute to allow sending cookies to the server only when a request is made using an HTTPS scheme.
After signing in to the CMC as the Cloud Admin, in the CMC > Server Configurations > Security, you can do the following:
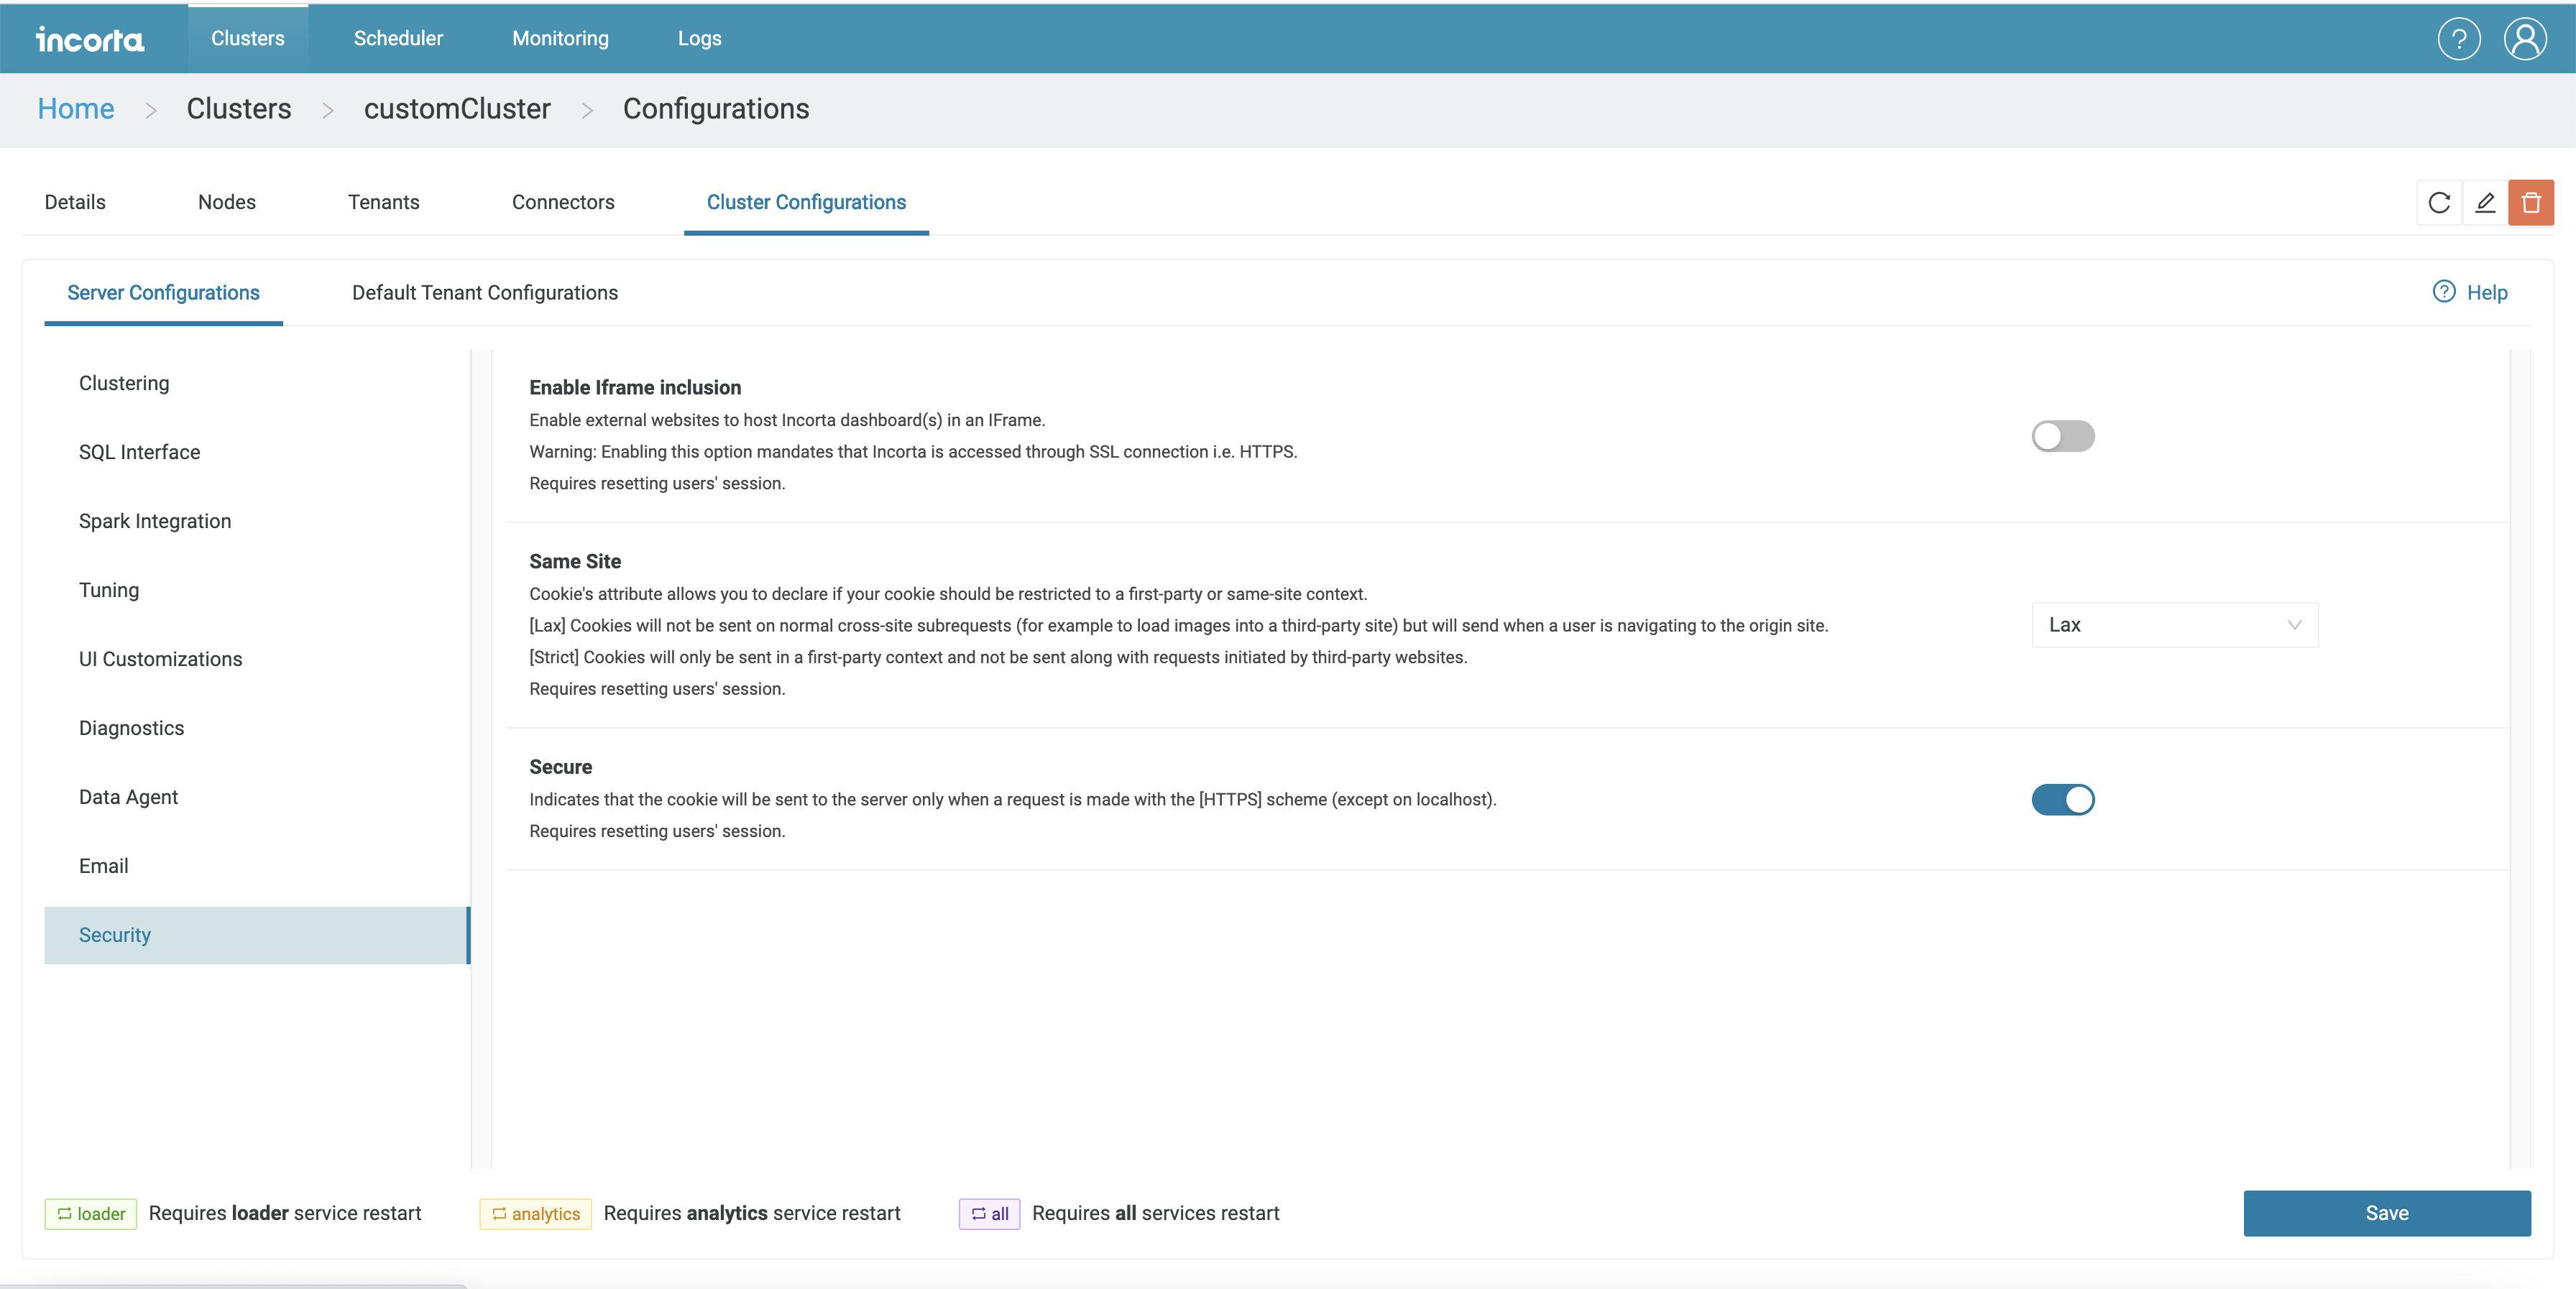
- Turn the Enable iFrame inclusion toggle off.
- Set the Same Site property to one of the following options:
- Lax (default): To prevent sending cookies on normal cross-site requests but allow sending them when navigating to your Incorta cluster. This option provides a reasonable balance between security and usability. It allows for maintaining the user’s session information when accessing the Incorta cluster using an external link, for example, while blocking it in Cross-Site Request Forgery (CSRF)-prone request methods (such as
POST). - Strict: To send cookies in a first-party context and not to send them along with requests initiated by third-party websites. This will prevent the browser from sending cookies to the target site in all cross-site browsing contexts, even when following a regular link.
- Lax (default): To prevent sending cookies on normal cross-site requests but allow sending them when navigating to your Incorta cluster. This option provides a reasonable balance between security and usability. It allows for maintaining the user’s session information when accessing the Incorta cluster using an external link, for example, while blocking it in Cross-Site Request Forgery (CSRF)-prone request methods (such as
- Enable the Secure toggle to allow sending cookies to the server only when a request is made using an HTTPS scheme.
Turning the Enable iFrame inclusion toggle on is similar to setting the SameSite attribute to None. The browser attaches the cookies in all cross-site browsing contexts. However, it mandates that Incorta is accessed through SSL connections (HTTPS).
To put these changes into action, users have to sign out and sign in again to reset their sessions.
For more information, refer to Guides → Configure Server → Security.