Connectors → Salesforce v2
About Salesforce
Salesforce is a cloud-based software company that provides a customer relationship management (CRM) platform and also sells a complementary suite of enterprise applications focused on customer service, marketing automation, analytics, and application development.
Salesforce Connector
The Incorta Salesforce v2 connector uses the following Salesforce.com APIs:
- Bulk: Provides a programmatic option to quickly load data from Salesforce. It is based on REST principles and is optimized for loading or deleting large sets of data. You can use it to query, queryAll, insert, update, upsert, or delete many records asynchronously by submitting batches. Salesforce processes batches in the background.
- SOAP: Optimized for real-time client applications that update a few records at a time.
- REST: Provides a mechanism for interacting with the Lightning Platform in situations where the Bulk API does not support a particular object or field type.
The Salesforce v2 connector is an independent JAR file and supports the following Incorta specific functionality:
| Feature | Supported |
|---|---|
| Chunking | ✔ |
| Data Agent | |
| Encryption at Ingest | |
| Incremental Load | ✔ |
| Multi-Source | ✔ |
| OAuth | |
| Performance Optimized | ✔ |
| Remote | |
| Single-Source | ✔ |
| Spark Extraction | |
| Webhook Callbacks | ✔ |
PK chunking for bulk queries is supported starting the 2023.7.0 release.
Deployment Steps within Salesforce
A Salesforce Administrator may need to enable the Salesforce API. In addition, a Salesforce Administrator creates and configures Incorta as a Salesforce Connected App. Here are the steps in Salesforce:
- Verify your organization has the API feature enabled. This feature is enabled by default for Performance, Unlimited, Enterprise, Developer and some Professional Editions.
- Verify your organization has the Bulk API feature enabled. This feature is enabled by default for Performance, Unlimited, Enterprise, and Developer Editions.
- Create a Connected App for Incorta.
- Enable OAuth Settings for API Integration.
Steps to connect Salesforce and Incorta
To connect Salesforce and Incorta, here are the high level steps, tools, and procedures:
- Create an external data source
- Create a schema with the Schema Wizard
- or, Create a schema with the Schema Designer
- Load the schema
- Explore the schema
Create an external data source
Here are the steps to create a external data source with the Salesforce connector:
- Sign in to the Incorta Direct Data Platform.
- In the Navigation bar, select Data.
- In the Action bar, select + New → Add Data Source.
- In the Choose a Data Source dialog, in Application, select Salesforce v2.
- In the New Data Source dialog, specify the applicable connector properties.
- To test, select Test Connection.
- Select Ok to save your changes.
Salesforce connector properties
Here are the properties for the Salesforce connector:
| Property | Control | Description |
|---|---|---|
| Username | text box | Enter the Salesforce username |
| Password | text box | Enter the Salesforce password |
| Token | text box | Enter the Salesforce token |
| Concurrent Connections | text box | Enter the number of concurrent Salesforce connections. The default is 0, which disables throttling. The recommendation is 5. |
| Proxy | toggle | Enable login via a proxy server |
| Proxy Host | text box | Enable Proxy to configure this property. Enter the proxy server IP address. |
| Proxy Port | text box | Enable Proxy to configure this property. Enter the proxy server port. |
| Proxy Username | text box | Enable Proxy to configure this property. Enter proxy server username. |
| Proxy Password | text box | Enable Proxy to configure this property. Enter the proxy server password. |
Create a schema with the Schema Wizard
Here are the steps to create a Salesforce schema with the Schema Wizard:
- Sign in to the Incorta Direct Data Platform.
- In the Navigation bar, select Schema.
- In the Action bar, select + New → Schema Wizard
- In (1) Choose a Source, specify the following:
- For Enter a name, enter the schema name.
- For Select a Datasource, select the Salesforce v2 external data source.
- Optionally create a description.
- In the Schema Wizard footer, select Next.
- In (2) Manage Tables, in the Data Panel, first select the name of the Data Source, and then check the Select All checkbox.
- In the Schema Wizard footer, select Next.
- In (3) Finalize:
- Deselect the Create joins between selected tables if foreign key relationships are detected checkbox.
- In the Schema Wizard footer, select Create Schema.
It is recommended that you create the joins between the Salesforce tables manually using the Salesforce data model for standard objects. Allowing Incorta to create the joins automatically could result in an error, or circular joins.
Create a schema with the Schema Designer
Here are the steps to create a Salesforce schema using the Schema Designer:
- Sign in to the Incorta Direct Data Platform.
- In the Navigation bar, select Schema.
- In the Action bar, select + New → Create Schema.
- In Name, specify the schema name, and select Save.
- In Start adding tables to your schema, select Salesforce.
- In the Data Source dialog, specify the Salesforce table data source properties.
- Select Add.
- In the Table Editor, in the Table Summary section, enter the table name.
- To save your changes, select Done in the Action bar.
Salesforce table data source properties
For a schema table in Incorta, you can define the following Salesforce specific data source properties as follows:
| Property | Control | Description |
|---|---|---|
| Type | drop down list | Default is Salesforce |
| Data Source | drop down list | Select the Salesforce external data source |
| Incremental | toggle | Enable incremental loading for the schema table |
| Query | text box | Enter the SQL query to retrieve data from Salesforce |
| Update Query | text box | Enable Incremental to configure this property. Enter the SQL query to retrieve data updates from Salesforce. |
| Callback | toggle | Enable post extraction callback |
| Callback URL | text box | Enable Callback to configure this property. Specify the URL. |
View the schema diagram with the Schema Diagram Viewer
Here are the steps to view the schema diagram using the Schema Diagram Viewer:
- Sign in to the Incorta Direct Data Platform.
- In the Navigation bar, select Schema.
- In the list of schemas, select the Salesforce schema.
- In the Schema Designer, in the Action bar, select Diagram.
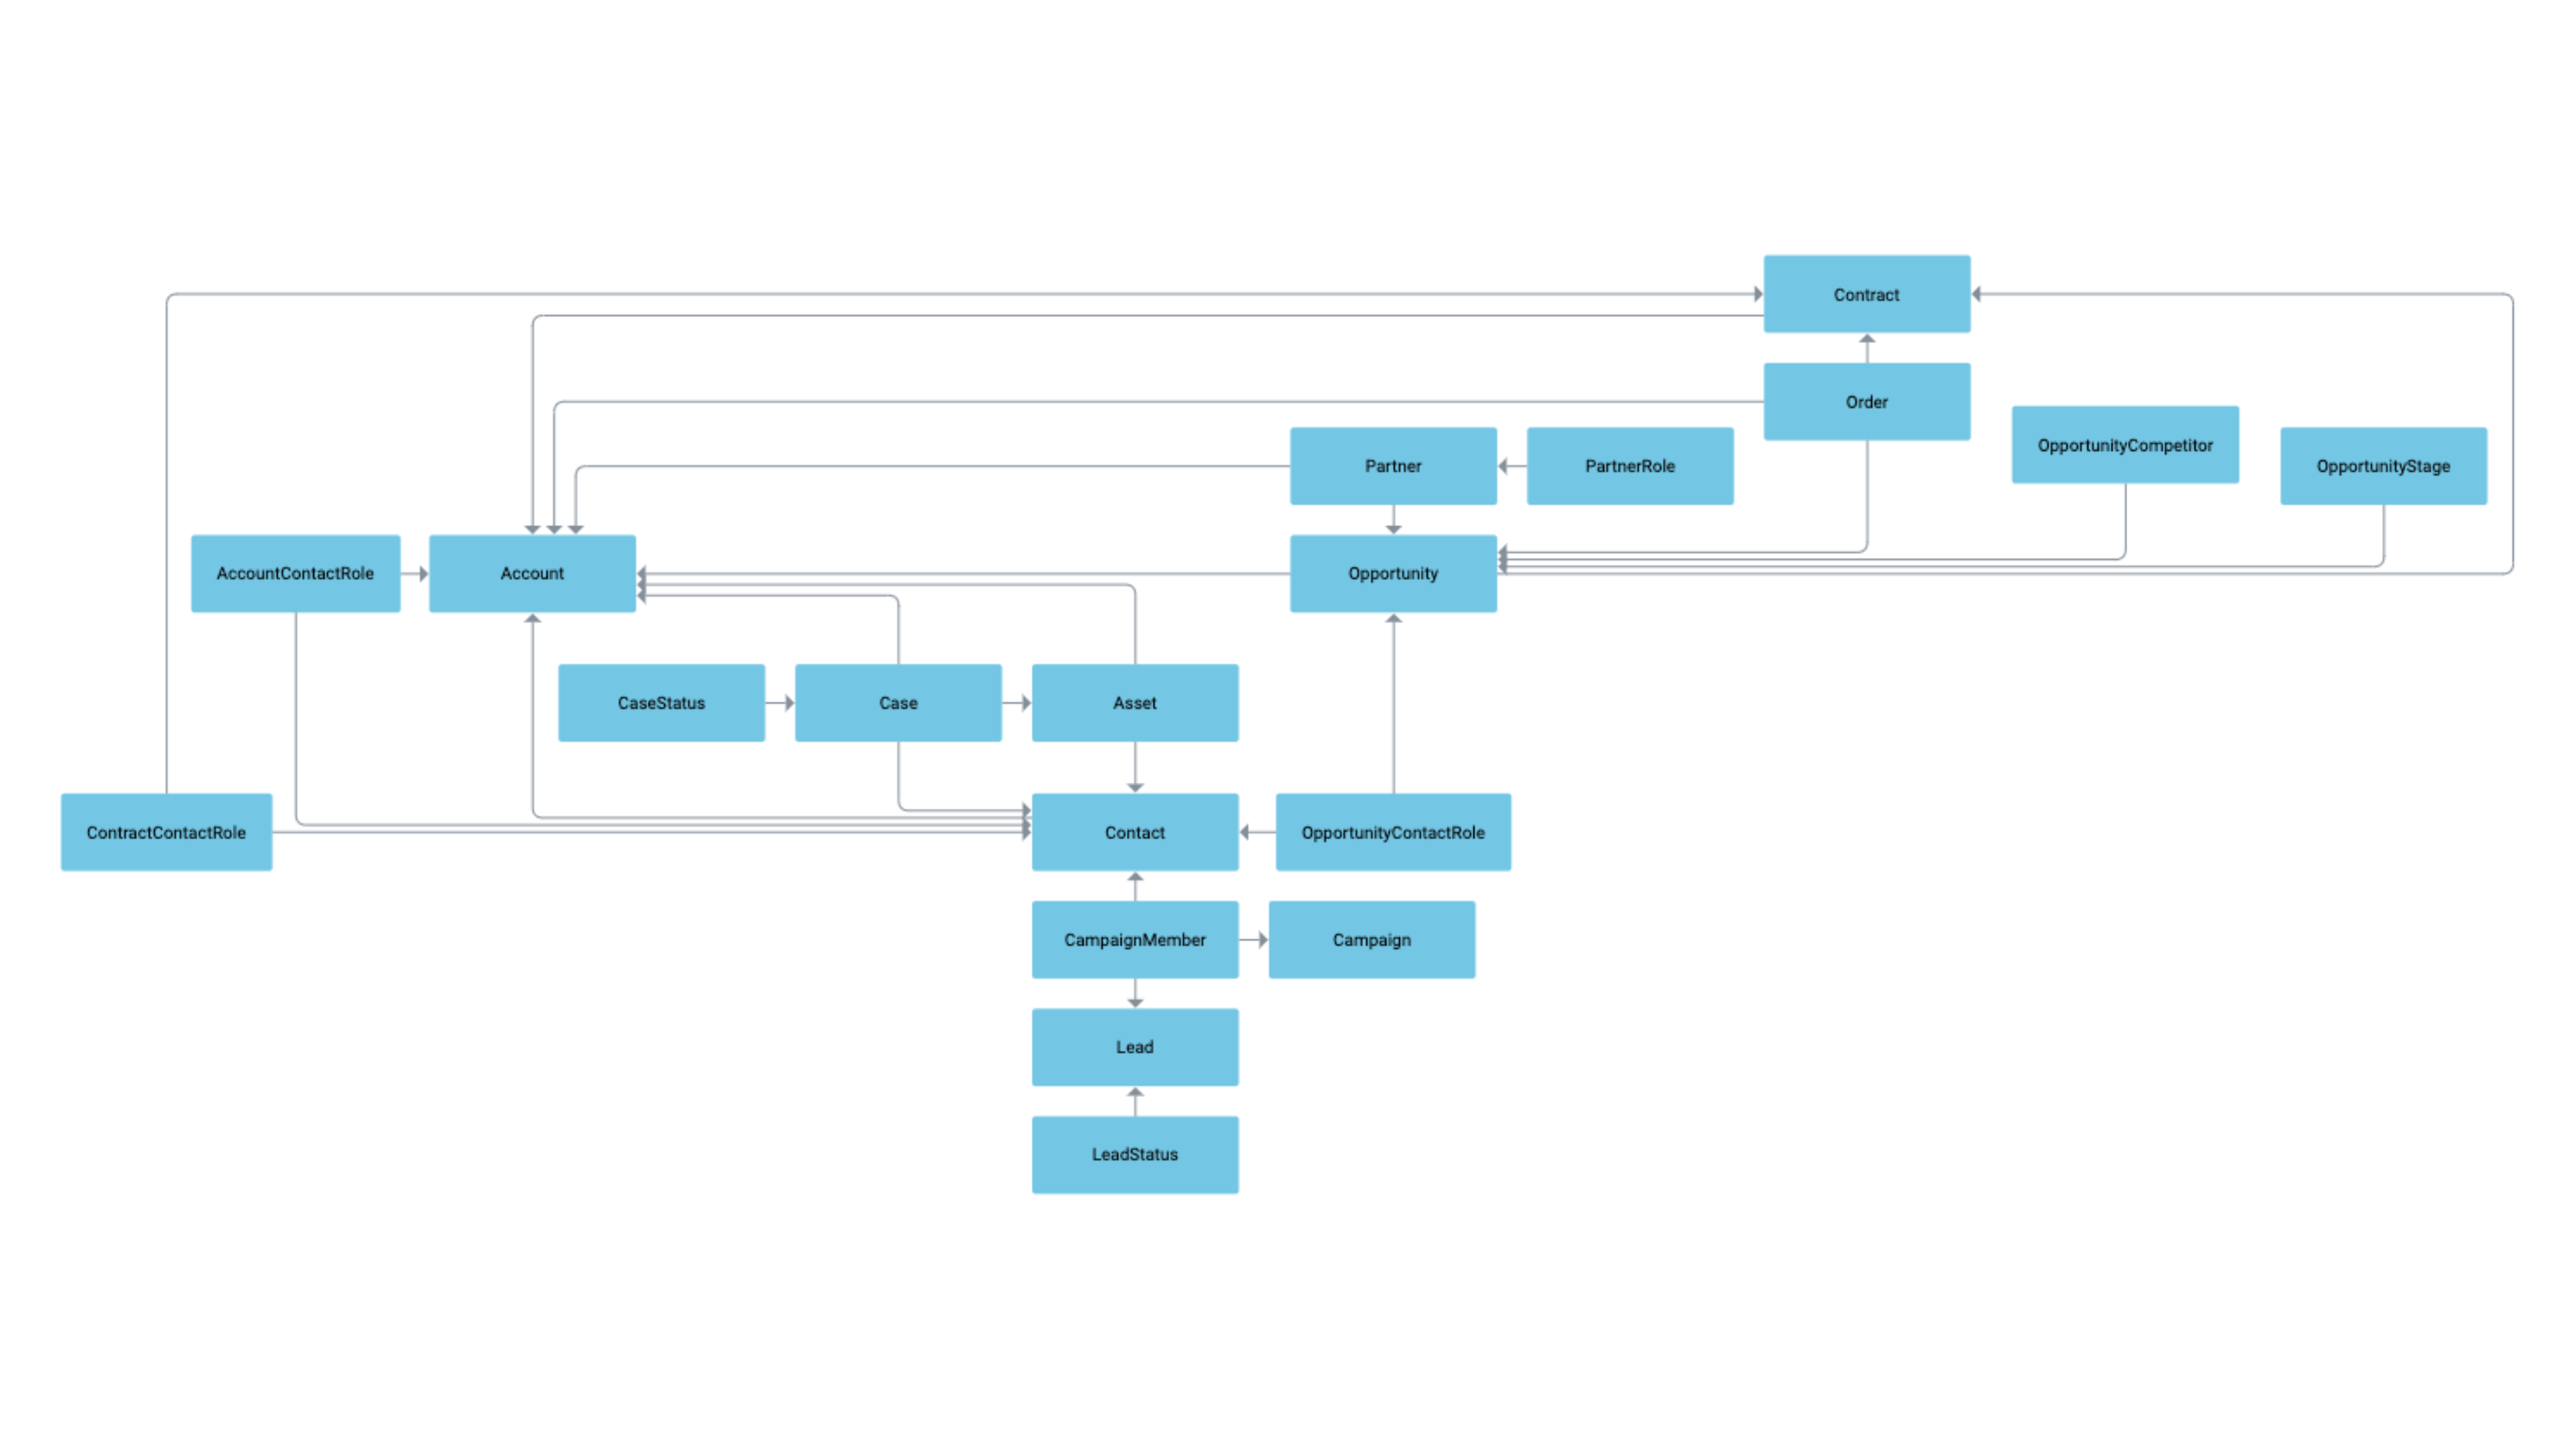
Salesforce schema diagram
The following is a Sales schema for an external data source that utilizes the Salesforce connector. This subset of the entire Salesforce entity relationship diagram (ERD) is provided for brevity.
Load the schema
Here are the steps to perform a Full Load of the Salesforce schema using the Schema Designer:
- Sign in to the Incorta Direct Data Platform.
- In the Navigation bar, select Schema.
- In the list of schemas, select the Salesforce schema.
- In the Schema Designer, in the Action bar, select Load → Load Now → Full.
- To review the load status, in Last Load Status, select the date.
Explore the schema
With the full load of the Salesforce schema complete, you can use the Analyzer to explore the schema, create your first insight, and save the insight to a new dashboard.
To open the Analyzer from the schema, follow these steps:
- In the Navigation bar, select Schema.
- In the Schema Manager, in the List view, select the Salesforce schema.
- In the Schema Designer, in the Action bar, select Explore Data.
Additional Considerations for the Salesforce v2 Connector
Optimize Loading Data with the Salesforce v2 Connector
There are a set of guidelines to follow in order to prevent errors when loading data with the Salesforce v2 connector. These guidelines are as follows:
- Limit a single Salesforce schema to 50-75 tables, by creating the schema based on a subject area, reporting function, or technical type (for example, Master Data or Transaction table).
- Enable the incremental load configuration for all tables.
- Enter a value of 5 for the Concurrent Connections property.
- As recommended above, upgrade to the Salesforce v2 connector as outlined in the next section, and remove the following Salesforce v1 connector files:
<INCORTA_NODE_INSTALLATION_PATH>/runtime/webapps/incorta/WEB-INF/lib/force-wsc-41.0.0.jar<INCORTA_NODE_INSTALLATION_PATH>/runtime/webapps/incorta/WEB-INF/lib/sf-partner-41.0.jar<INCORTA_NODE_INSTALLATION_PATH>/runtime/webapps/incorta/WEB-INF/lib/metadata-41.0.wsdl<INCORTA_NODE_INSTALLATION_PATH>/runtime/webapps/incorta/WEB-INF/lib/partner-41.0.wsdl
Upgrade the Salesforce v2 Connector
It is possible to upgrade the Salesforce v2 connector independent of the Incorta installation. This is a characteristic of a connector with a JAR file that resides in a sub-directory of /extensions/connectors/.
In certain cases, the Incorta Global Support team may suggest that you upgrade the connector. An upgrade requires a System Administrator with root access to all Incorta Cluster hosts for the Incorta Nodes and the Cluster Management Console (CMC). In addition, a CMC Administrator will need to restart the Incorta Cluster services.
Deployment of the Salesforce connector requires a restart of the entire Incorta Cluster, including the Cluster Management Console (CMC), Loader Service, Analytics Service, and any add-ons such as a Notebook Service.
Here are the steps to deploy a new connector JAR file to the extensions directory:
Copy the JAR file
- Rename the existing JAR file (e.g.
incorta.connector.salesforce.jar.backup_202010080). - Download the Salesforce v2 JAR file update.
- For each Incorta Nodes host, copy the JAR file to:
<Installation_Path>/IncortaNode/extensions/connectors/salesforce/ - For the host of the Cluster Management Console, copy the JAR file to:
<Installation_Path>/CMC/extensions/connectors/salesforce/
Restart the Incorta Cluster
Restart the Incorta Cluster including the Cluster Management Console.
Stop the Incorta Services and the CMC
Either using the CMC or the shell scripts, start the Analytics and Loader Services for the cluster.
The default directory for the CMC is /home/incorta/IncortaAnalytics/cmc. Stop the CMC with the stop-cmc.sh shell script:
./stop-cmc.sh
Start the CMC and the Incorta Services
Start the CMC with the start-cmc.sh shell script:
./start-cmc.sh
Either using the CMC or the shell scripts, start the Analytics and Loader Services for the cluster.