Data Applications → Install and Configure NetSuite for Incorta Cloud
About the NetSuite Data Application for Incorta Cloud
The NetSuite data application provides a new, faster, more effective option for analyzing and understanding your data, with no data modeling or transformation required. You will get instant access to up-to-date, consolidated enterprise resource planning (ERP) data and can build all of the high-performance reports you need on your own.
With an extensive library of pre-built content, NetSuite users gain immediate access to rich content areas and sample dashboards that are easily customizable and logically grouped by department and persona to help answer the most pressing business questions quickly.
In addition, the NetSuite data application expedites your organization’s migration from legacy reporting tools, and drastically speeds your NetSuite-based reporting and analytics project’s time to value. It also lets you more quickly add new data sources to your NetSuite analysis.
Following are the NetSuite functional areas available in the NetSuite data application of Incorta Cloud:
- Finance
- Human Resources (HR)
- Operations
- Sales
Install the NetSuite Data Application
Here are the steps to install the NetSuite data application:
- Sign in to the Incorta Cloud Admin Portal (CAP).
- With a cluster connected, in the Navigation bar, select Data Apps.
- Select Install for the NetSuite data application. You can use the Filter panel or the Search bar to display only the relevant data applications.
- The Install data application dialog appears. Edit the Cluster, Tenant, Username, and Password properties as necessary.
- Enable Include Sample Data to include NetSuite sample data in the data application installation, which will allow you to preview the data application dashboards and insights before you connect to your Netsuite instance and configure the data application for your instance.
- Select Install.
About the NetSuite Data Application Schemas
Physical Schemas
The NetSuite data application physical schemas in Incorta contain tables and fields that replicate the structure of the Netsuite data as detailed in the Netsuite Connect Browser. Here are the predefined NetSuite data application physical schemas:
- Date: Date dimensions that correspond to the accounting period setup in NetSuite
- NS_accounting: General accounting and segmentation tables, including chart of accounts, subsidiaries, currencies, classes, departments, locations, and more
- NS_entity: Entity-related tables, including customers, vendors, employees, and more
- NS_inventory: Inventory levels across locations
- NS_items: Item related tables
- NS_roles_permissions: Roles and permissions coming from the NetSuite environment; used for companies that wish to define row-level security in Incorta to mimic their NetSuite configuration
- NS_static: NetSuite static tables that have no last modified date and always need to be loaded in their entirety, including states and countries
- NS_system: NetSuite metadata tables that provide core details about the NetSuite environment
- NS_transactions: Transaction related tables for all types of transactions, including order to cash, procure to pay, cases, journal entries, and more
- OnlineStore: A sample physical schema for sales details.
Business Schemas and Views
Business schemas are alternative representations of the data, potentially combining data from multiple tables, that can help you better understand and utilize the data. Here are the predefined NetSuite data application business schemas and their associated views:
- ns_common: Contains the following key criteria and dimension business views related to transactions, items, and entities
- core_criteria: Contains key account and transaction information
- core_dimensions: Contains subsidiary, class, location, department, and currency information
- dates: Contains transaction, shipment, and receipt dates
- transaction: Contains transaction details
- item: Contains item details
- entity: Contains customer, vendor, employee, and sales rep information
- last_udpated: Contains information on when physical schemas were last updated
- ns_finance: Contains the following business views for accounting, accounts receivable (AR), collections, accounts payable (AP), fixed assets, and more
- accounts: Contains accounts payable information
- entity: Contains payment term information
- ar: Contains accounts receivable aging information
- ns_hr: Contains the following business views for employees, roles and permissions
- core_criteria: Contains key employee information
- employee: Contains employee details
- ns_inventory: Contains the following business views for the item location map table, which provides item inventory levels by location
- location_address: Contains inventory location details
- item_location_data: Contains inventory status
- item_master: Contains inventory item details
- ns_operations: Contains the following business view for fulfillment, purchasing, and supply chain
- core_criteria: Contains transfer order line type
- transaction: Contains transaction transfer and open item information
- ns_sales: Contains the following business views for sales, opportunities, estimates and pipeline
- dates: Contains expected close dates
- transaction: Contains projected transaction totals
- Online_Store: A sample business schema that contains the following business views:
- Customers: Customers ranked by average sales volume, with sales metrics
- OrderDetails: Line item details from every order
- RevenueDetail: Computed revenue metrics and various dimensions
- MonthlyRevenueSummary: An aggregate view of revenue
Configure the NetSuite Data Application
There are required and optional steps to configure the NetSuite data application. To connect the data application to your NetSuite instance, the following steps are required:
- Configure the NetSuite data application data source
- Perform a full load of the NetSuite data application physical schemas
You can optionally apply NetSuite customizations to the data application. These steps are covered in detail below.
Configure the NetSuite Data Application Data Source
To connect the data application to your NetSuite data, follow these steps:
Sign in to the Incorta Cloud Admin Portal (CAP).
In the Navigation bar, select Clusters.
Select the Cluster you installed the NetSuite data application on.
Select Incorta Analytics.
In the Navigation bar, select Data.
In the Data Manager, in the Context bar, select the External Data Source tab.
In the List View of external data sources, for the NetSuite data source, select Edit (pen icon).
Enter the NetSuite connection properties for your instance:
- User Email
- Password
- Connection Pool: 30
- Connection String:
jdbc:ns://<HOST>:<PORT>;ServerDataSource=NetSuite.com;encrypted=1;CustomProperties=(AccountID=<ACCOUNT ID>;RoleID=<ROLE ID>) - Connection Properties (optional)
Refer to Connectors → NetSuite SuiteAnalytics for more information.
Perform a Full Load of the NetSuite Data Application Physical Schemas
- In the Navigation bar, select Schema.
- In the Schema Manager, select the Schemas tab.
- In the physical schema list view, select each of the schemas below to open it. In the Schema Manager, in the Action bar, select Load → Full Load to load all tables in the physical schema.
NS_accountingNS_dateNS_entityNS_inventoryNS_itemsNS_role_permissionsNS_staticNS_systemNS_transactions
You can run future full or incremental loads to keep your NetSuite data current. For example, you can update the ACCOUNTS table in the NS_accounting physical schema with new account records added to NetSuite. Refer to Connectors → NetSuite SuiteAnalytics for more information.
The NetSuite account parent/child hierarchy is built into the Incorta NetSuite data application, and any parent/child relationships entered into NetSuite will be loaded into the ACCOUNTS table in the NS_accounting physical schema when you load it.
Apply Customizations to the Netsuite Data Applications
Following are common NetSuite customizations that you can optionally incorporate into the data application:
- Add a custom attribute column to a standard entity
- Add a custom ID column that references a standard entity
- Add a custom ID column that references a custom list
When you add custom attributes, IDs, and entities, you will need to refresh the data application metadata. The detailed steps are included in the customization sections below.
Add a Custom Attribute Column to a Standard Entity
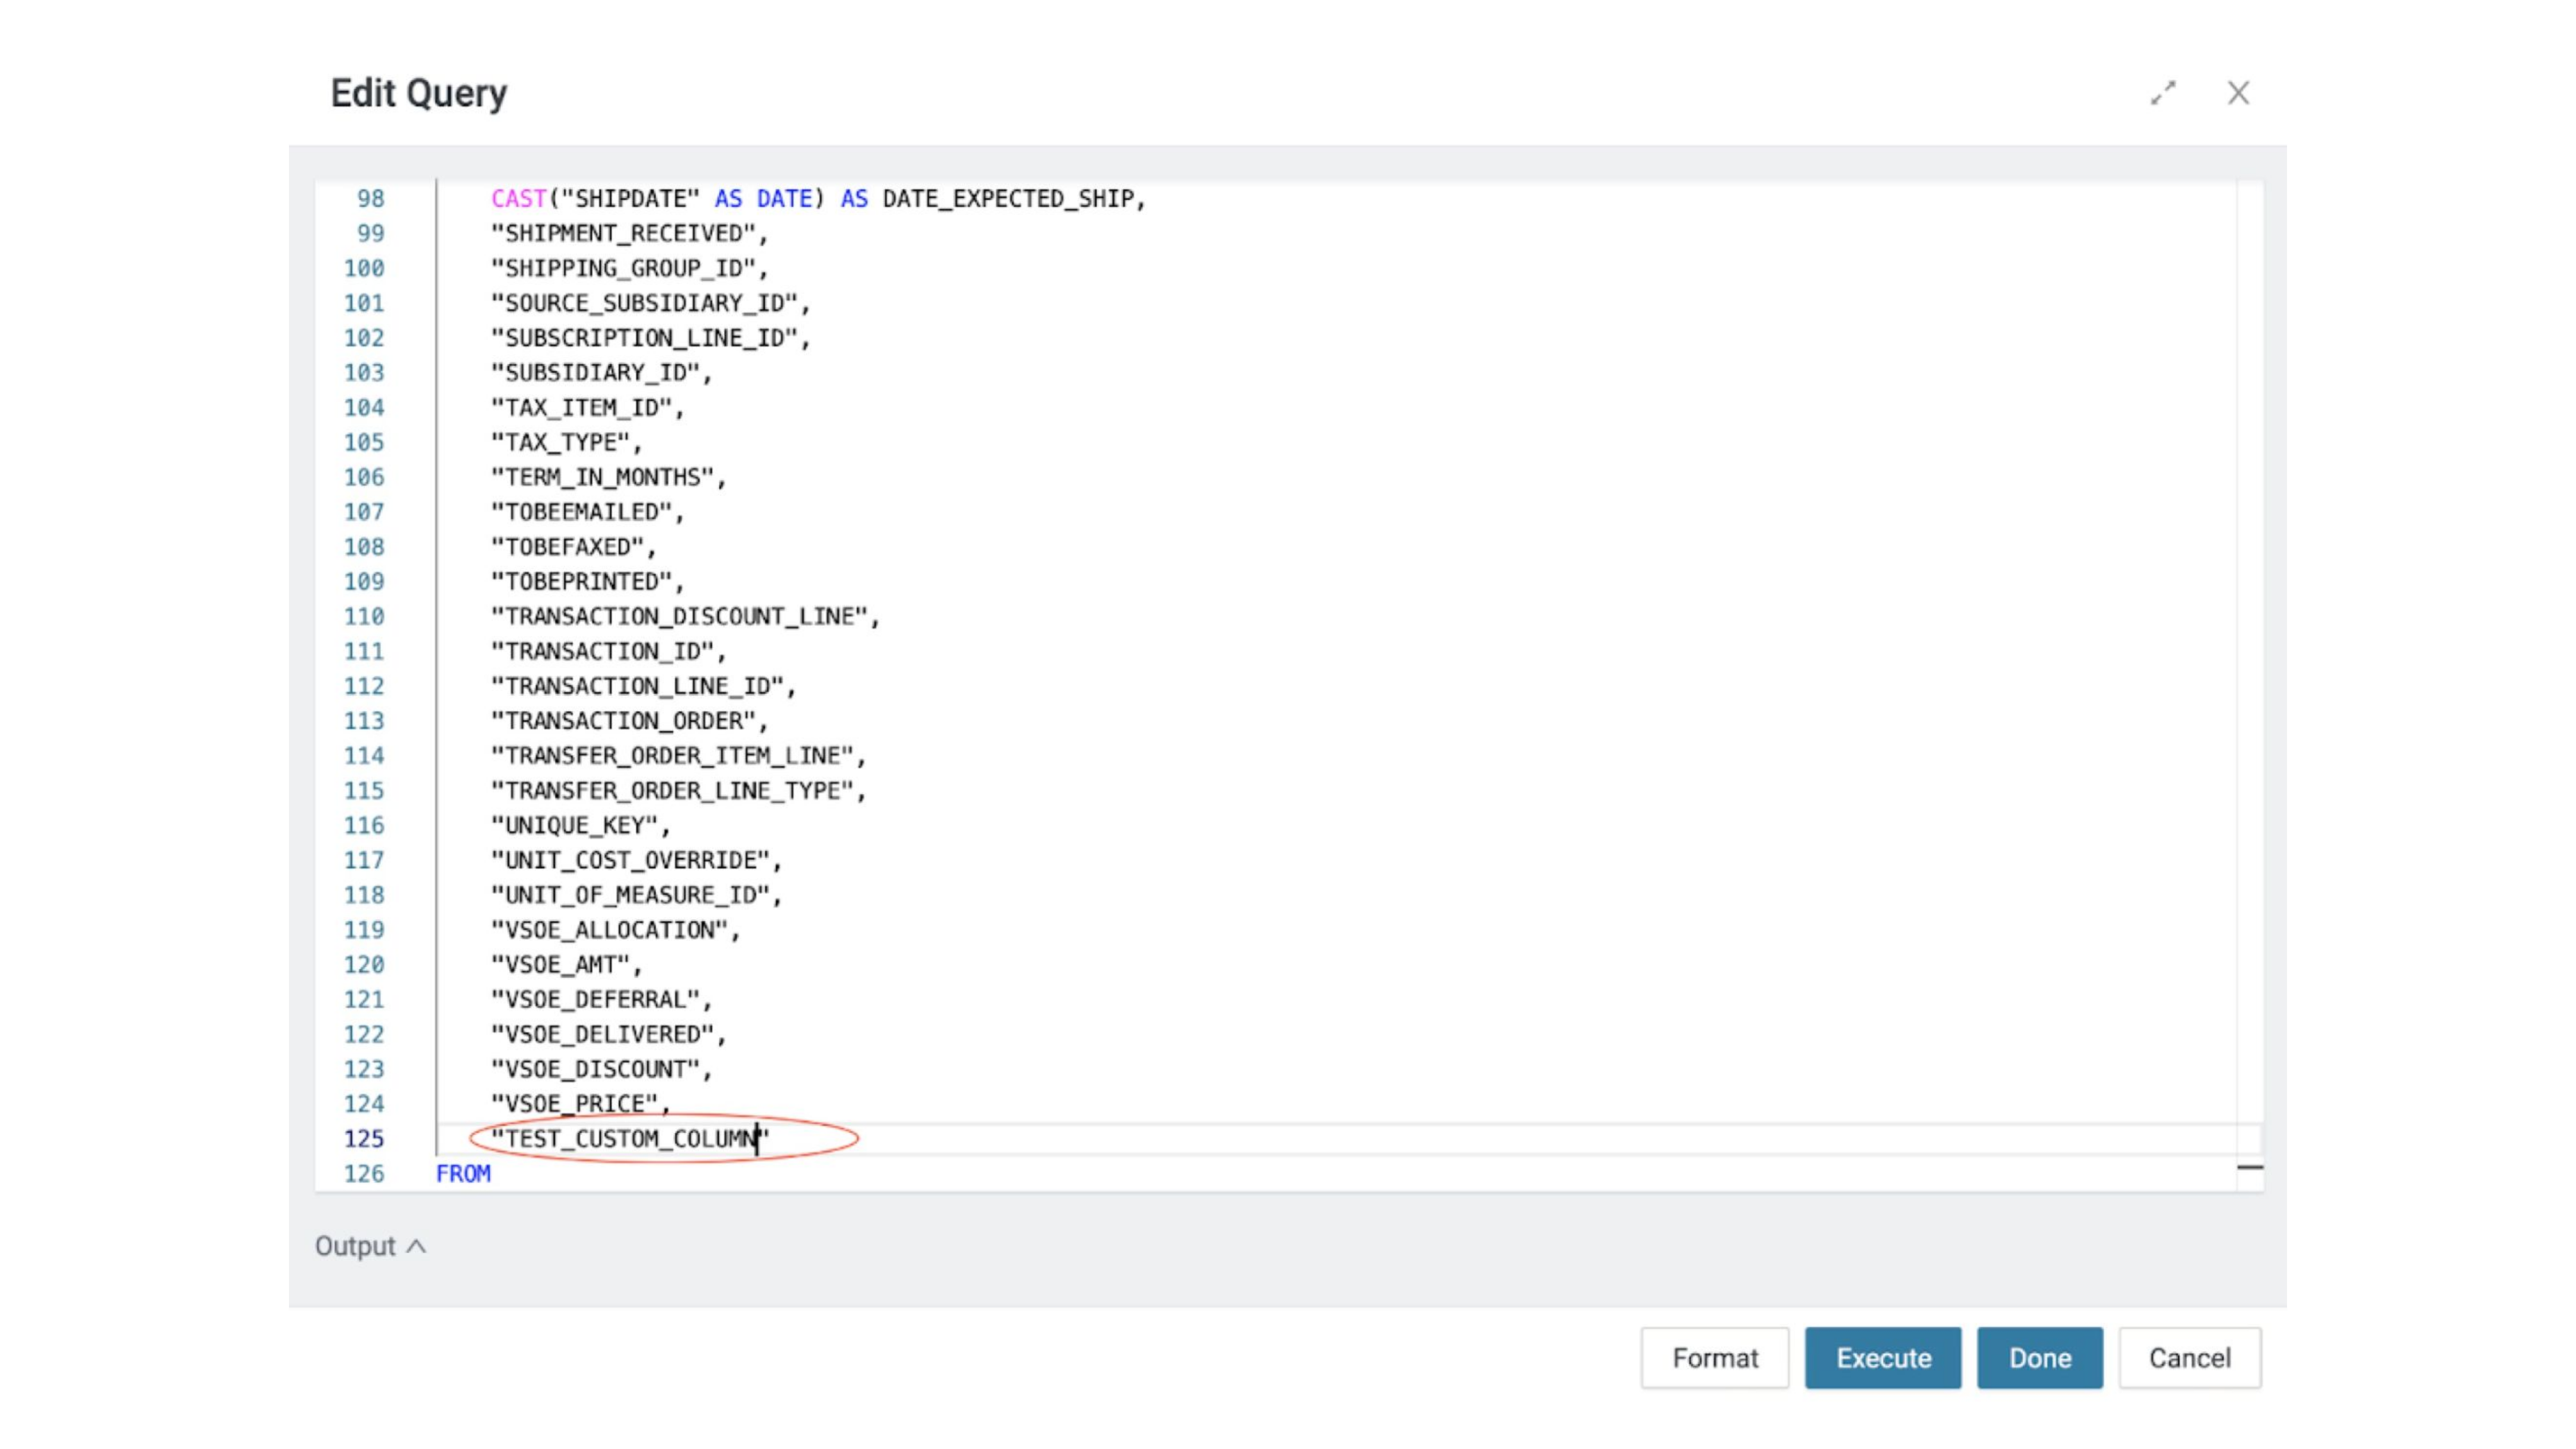
You can add a custom attribute column to a data application. An example will demonstrate the steps involved. In this example, a NetSuite custom attribute, TEST_CUSTOM_COLUMN, will be added to the TRANSACTION_LINES table in the NS_transactions physical schema.
Add the Custom Column to the Data Application Physical Schema Table
Here are the steps to add TEST_CUSTOM_COLUMN to the TRANSACTION_LINES table:
- In the Navigation bar, select Schema.
- In the Schema Manager, select the Schemas tab.
- In the list view of physical schemas, select the NS_transactions schema to open it.
- In the Schema Designer, in the Tables section, select the TRANSACTION_LINES table to open it.
- In the Table Editor, select the NetSuite SQL icon to open the Data Source dialog.
- In the Data Source dialog, in Query, add TEST_CUSTOM_COLUMN to the end of the SELECT statement as shown below.
- Select Validate.
- Select Done.
Reload the Data Application Physical Schema Table
Perform a full reload of the TRANSACTION_LINES table. Select the down arrow at the far right of the TRANSACTION_LINES table and select Load Table.
Add the Custom Column to the Data Application Business Schema
Here are the steps to add TEST_CUSTOM_COLUMN to the transaction business schema:
- In the Navigation bar, select Business Schema.
- In the Business Schema Manager, select the transaction business schema to open it.
- In the Business Schema Designer, for the transaction business view, select More Options (⋮ vertical ellipsis).
- Select Edit.
- To add TEST_CUSTOM_COLUMN, drag and drop it from the Data panel to the business schema view.
- In the Action bar, select Done.
Add the Custom Column to the Data Application Dashboard Insight
Here are the steps to add TEST_CUSTOM_COLUMN to a data application dashboard insight:
- In the Navigation bar, select Content.
- Select a dashboard to open it.
- For an insight on a dashboard tab, select Edit (pen icon).
- In the Analyzer, in the Data panel, add the transaction business schema if it has not already been added.
- To add the transaction business schema, select Manage Dataset. In the Manage Data Sets panel, in views, select transaction.
- In the Data panel, drag and drop TEST_CUSTOM_COLUMN to a tray in the Insight panel.
Refresh the Data Application Metadata
The NetSuite data application metadata is in the NS_system physical schema. You can refresh the metadata when you reload the physical schema with the following steps:
- In the Navigation bar, select Schema.
- In the Schema Manager, select the Schemas tab.
- In the list view of physical schemas, select the NS_system schema to open it.
- In the Schema Designer, in the Action bar, select Load → Full Load.
You can view a list of primary/foreign keys and table columns in the Incorta NetSuite metadata dashboards:
- In the Navigation bar, select Content.
- Select the Audit-Admin folder.
- Select the NetSuite System (Tables-Fields-Keys) folder.
- Select the NetSuite System-Primary/Foreign Keys dashboard to view the primary/foreign keys.
- Select the NetSuite System-Tables/Fields/Columns dashboard to view the table columns, including custom columns.
Add a Custom ID Column that References a Standard Entity
You can add a custom ID column that references a standard entity to a data application as a foreign key. An example will demonstrate the steps involved. In this example, a NetSuite custom ID column, TEST_CUSTOM_COLUMN_ID, references a standard list, COMPANY_SIZE. TEST_CUSTOM_COLUMN_ID and COMPANY_SIZE will be added to the CUSTOMERS table in the NS_entity physical schema.
Add the Custom ID Column to the Data Application Physical Schema Table
Here are the steps to add TEST_CUSTOM_COLUMN_ID to the CUSTOMERS table:
- In the Navigation bar, select Schema.
- In the Schema Manager, select the Schemas tab.
- In the list view of physical schemas, select the NS_entity schema to open it.
- In the Schema Designer, in the table section, select the CUSTOMERS table to open it.
- In the Table Editor, select the NetSuite SQL icon to open the Data Source dialog.
- In the Data Source dialog, in Query, add the TEST_CUSTOM_COLUMN_ID column to the end of the SELECT statement.
- Select Validate.
- Select Done.
Add the Referenced Standard Entity using the Schema Wizard
Here are the steps to add COMPANY_SIZE to the NS_entity physical schema:
- In the Navigation bar, select Schema.
- In the Schema Manager, select the Schemas tab.
- In the list view of physical schemas, select the NS_entity schema to open it.
- In the Schema Designer, in the Action bar, select +New → Schema Wizard.
- In Select a Datasource, select NetSuite.
- Select Next.
- In the Edit panel
- Select the COMPANY_SIZE table.
- Select Next.
- In Finalize
- Uncheck Create joins between selected tables if foreign key relationships are detected.
- Select Finish.
Create a Join between the Standard Entity Tables
Here are the steps to create a join between CUSTOMERS and COMPANY_SIZE:
- In the Navigation bar, select Schema.
- In the Schema Manager, select the Schemas tab.
- In the list view of physical schemas, select the NS_entity schema to open it.
- In the Schema Designer, in the Action bar, select +New → Join.
- For Child
- Select the CUSTOMERS table.
- Select the TEST_CUSTOM_COLUMN_ID column.
- For Parent
- Select the COMPANY_SIZE table.
- Select the LIST_ID column.
Load the Standard Entity Tables
Perform a full load of the CUSTOMERS and COMPANY_SIZE tables. Select the down arrow at the far right of each table and select Load Table.
Add the Referenced Standard Entity to the Data Application Business Schema
Here are the steps to add COMPANY_SIZE or any of its columns to the sales business schema:
- In the Navigation bar, select Business Schema.
- In the Business Schema Manager, select the sales business schema to open it.
- In the Business Schema Designer, for the entity business view, select More Options (⋮ vertical ellipsis).
- Select Edit.
- To add COMPANY_SIZE or any of its columns, drag and drop it from the Data panel to the business schema view.
- In the Action bar, select Done.
Add the Referenced Standard Entity to a Data Application Dashboard Insight
Here are the steps to add COMPANY_SIZE or any of its columns to a data application dashboard insight:
- In the Navigation bar, select Content.
- Select a dashboard to open it.
- For an insight on a dashboard tab, select Edit (pen icon).
- In the Analyzer, in the Data panel, add the sales business schema if it has not already been added.
- In the Data panel, drag and drop COMPANY_SIZE or any of its columns to a tray in the Insight panel.
Refresh the Data Application Metadata
The NetSuite data application metadata is in the NS_system physical schema. You can refresh the metadata when you reload the physical schema with the following steps:
- In the Navigation bar, select Schema.
- In the Schema Manager, select the Schemas tab.
- In the list view of physical schemas, select the NS_system schema to open it.
- In the Schema Designer, in the Action bar, select Load → Full Load.
You can view a list of primary/foreign keys and table columns in the Incorta NetSuite metadata dashboards:
- In the Navigation bar, select Content.
- Select the Audit-Admin folder.
- Select the NetSuite System (Tables-Fields-Keys) folder.
- Select the NetSuite System-Primary/Foreign Keys dashboard to view the primary/foreign keys.
- Select the NetSuite System-Tables/Fields/Columns dashboard to view the table columns, including custom columns.
Add a Custom ID Column that References a Custom List
You can add a custom ID column that references a custom list to a data application as a foreign key. An example will demonstrate the steps involved. In this example, a NetSuite custom ID column, TEST_CUSTOM_COLUMN_ID, references a custom list, TEST_CUSTOM_LIST. TEST_CUSTOM_COLUMN_ID and TEST_CUSTOM_LIST will be added to the CUSTOMERS table in the NS_entity physical schema.
Add the Custom ID Column to the Data Application Physical Schema Table
Here are the steps to add TEST_CUSTOM_COLUMN_ID to the CUSTOMERS table:
- In the Navigation bar, select Schema.
- In the Schema Manager, select the Schemas tab.
- In the list view of physical schemas, select the NS_entity schema to open it.
- In the Schema Designer, in the Tables section, select the CUSTOMERS table to open it.
- In the Table Editor, select the NetSuite SQL icon to open the Data Source dialog.
- In the Data Source dialog, in Query, add the TEST_CUSTOM_COLUMN_ID column to the end of the SELECT statement.
- Select Validate.
- Select Done.
Add the Referenced Custom List using the Schema Wizard
Here are the steps to add TEST_CUSTOM_LIST to the NS_entity physical schema:
- In the Navigation bar, select Schema.
- In the Schema Manager, select the Schemas tab.
- In the list view of physical schemas, select the NS_entity schema to open it.
- In the Schema Designer, in the Action bar, select +New → Schema Wizard.
- In Select a Datasource, select NetSuite.
- Select Next.
- In the Edit panel
- Select the TEST_CUSTOM_LIST table.
- Select Next.
- In Finalize
- Uncheck Create joins between selected tables if foreign key relationships are detected.
- Select Finish.
Create a Join between the Standard Entity Tables
Here are the steps to create a join between CUSTOMERS and TEST_CUSTOM_LIST:
- In the Navigation bar, select Schema.
- In the Schema Manager, select the Schemas tab.
- In the list view of physical schemas, select the NS_entity schema to open it.
- In the Schema Designer, in the Action bar, select +New → Join.
- For Child
- Select the CUSTOMERS table.
- Select the TEST_CUSTOM_COLUMN_ID column.
- For Parent
- Select the TEST_CUSTOM_LIST table.
- Select the LIST_ID column.
Load the Standard Entity Tables
Perform a full load of the CUSTOMERS and TEST_CUSTOM_LIST tables. Select the down arrow at the far right of each table and select Load Table.
Add the Referenced Custom List to the Data Application Business Schema
Here are the steps to add TEST_CUSTOM_LIST or any of its columns to the sales business schema:
- In the Navigation bar, select Business Schema.
- In the Business Schema Manager, select the sales business schema to open it.
- In the Business Schema Designer, for the entity business view, select More Options (⋮ vertical ellipsis).
- Select Edit.
- To add TEST_CUSTOM_LIST or any of its columns, drag and drop it from the Data panel to the business schema view.
- In the Action bar, select Done.
Add the Referenced Custom List to a Data Application Dashboard Insight
Here are the steps to add TEST_CUSTOM_LIST or any of its columns to a data application dashboard insight:
- In the Navigation bar, select Content.
- Select a dashboard to open it.
- For an insight on a dashboard tab, select Edit (pen icon).
- In the Analyzer, in the Data panel, add the sales business schema if it has not already been added.
- Drag and drop TEST_CUSTOM_LIST or any of its columns to a tray in the Insight panel.
Refresh the Data Application Metadata
The NetSuite data application metadata is in the NS_system physical schema. You can refresh the metadata when you reload the physical schema with the following steps:
- In the Navigation bar, select Schema.
- In the Schema Manager, select the Schemas tab.
- In the list view of physical schemas, select NS_system to open it.
- In the Schema Designer, in the Action bar, select Load → Full Load.
You can view a list of primary/foreign keys and table columns in the Incorta NetSuite metadata dashboards:
- In the Navigation bar, select Content.
- Select the Audit-Admin folder.
- Select the NetSuite System (Tables-Fields-Keys) folder.
- Select the NetSuite System-Primary/Foreign Keys dashboard to view the primary/foreign keys.
- Select the NetSuite System-Tables/Fields/Columns dashboard to view the table columns, including custom columns.